# ビデオ会議システム Jitsi Meet on Docker (+ Podman Pods)
**URL:** https://forum.ficusonline.com/t/topic/381
**Category:** Server
**Created:** [2020 年 7 月 31 日午前 9:30 UTC](https://forum.ficusonline.com/t/topic/381 "2020-07-31T09:30:00Z")
**Posts on this page:** 6
**Page:** 1
### Author:  [@tk-fuse](https://forum.ficusonline.com/u/tk-fuse)
#### Post date: [2020 年 7 月 31 日午前 9:30 UTC](https://forum.ficusonline.com/t/topic/381/1 "2020-07-31T09:30:00Z")
オープンソース会議システム **Jitsi** 構築プロジェクト:Dockerによるスタンドアローンデプロイ
> **[GitHub - jitsi/docker-jitsi-meet at stable-4857](https://github.com/jitsi/docker-jitsi-meet/tree/stable-4857)**
>
> Jitsi Meet on Docker. Contribute to jitsi/docker-jitsi-meet development by creating an account on GitHub.
**Jitsi Meet**
> **[Jitsi Meet](https://meet.jit.si/)**
>
> Join a WebRTC video conference powered by the Jitsi Videobridge
オープンソースであるウェブ会議システムJitsiをDockerにより構築します。商用のウェブ会議システムであるZoom,Webexなどは無料サービスとしても提供されていますが、会議時間・参加人数などに制限が設けられています。Jitsiによるウェブ会議システムを独自に構築する場合のメリットは、時間・人数制限なしのサービスを実現できることに加え、必要に応じてシステムの拡張・機能追加・カスタマイズが行えるという点にあります。Jitsiはブラウザ上での動作に加え、iPhone、Android向けに専用アプリも用意されています。
今回構築するJitsiによる会議システムは、主に以下5つの基本ブロックから構成されています。docker-composeにより、ウェブサーバとウェブインターフェイスの各ブロックが一つのイメージファイルとして纏められコンテナとして起動、その他ブロックは各々のイメージファイルを持ち、これらイメージファイルからコンテナとして起動します。サーバ側のネットワーク環境は、Nginxのリバースプロキシ経由とし、このリバースプロキシでLet’s EncryptによるSSL接続を確立・処理します。
1. Jitsi-Meet:ウェブインターフェイスであるファイル群
2. Nginx:ウェブサーバ
3. Prosody:XMPPサーバ
4. Jicofo:ユーザセッションの交換、ビデオストリームチャネルの割当
5. Jvb:Jitsi Video Bridge ビデオストリームサーバ、バンド幅の監視・コントロール

#### jitsi-prosody
| Port | Description |
| --- | --- |
| `5222` | Prosody Clent Listening Port |
| `5280` | Prosody Server Listening Port |
| `5347` | Prosody Components |
#### jitsi-videobridge
| Port | Description |
| --- | --- |
| `443` | Jitsi Video Bridge Harvester Port |
| `5347` | Prosody Components |
| `4443` | Jitsi Video Bridge Harvester Port |
| `10000-20000/udp` | Web RTC / ICE |
#### jitsi-jicofo
| Port | Description |
| --- | --- |
| `5222` | Prosody Client Port |
| `5347` | Prosody Components |
#### jitsi-meet
| Port | Description |
| --- | --- |
| `80` | Nginx Listening Port |
| `5280` | Prosody Server Listening Port |
インストールプロセスは以下の通りです。
1. Nginxリバースプロキシサーバの設定
2. CertbotによるSSL認証
3. Jitsi Meet on Dockerのダウンロード・設定
4. 動作確認
**Jitsi Meet on Docker**
> **[GitHub - jitsi/docker-jitsi-meet at stable-4857](https://github.com/jitsi/docker-jitsi-meet/tree/stable-4857)**
>
> Jitsi Meet on Docker. Contribute to jitsi/docker-jitsi-meet development by creating an account on GitHub.
**Jitsi Meet**
> **[Jitsi Meet](https://meet.jit.si/)**
>
> Join a WebRTC video conference powered by the Jitsi Videobridge
## **1.Nginxリバースプロキシの設定**
予めJitsi専用のドメイン **[www.jitsi-example.com](http://www.jitsi-example.com)** (名称任意)を取得しておきます。Jitsiをインストールするマシンとは別に、同一LANネットワーク内にNginxによるリバースプロキシを用意します(NginxリバースプロキシもDockerコンテナとしてインストール。リバースプロキシをコンテナとして稼働させない場合は、以下Dockerコマンドの箇所を省略して下さい)。
上記ドメイン専用の設定ファイル **/etc/nginx/conf.d/jitsi-example.conf** (名称任意)を用意します。内容は以下の通りです。
```auto
server {
server_name www.jitsi-example.com;
server_tokens off;
# access_log /var/log/nginx/www.jitsi-example.com.access.log;
# error_log /var/log/nginx/www.jitsi-example.com.error.log error;
location / {
proxy_pass http://192.168.xx.xxx:8000;
proxy_set_header Host $host;
proxy_set_header X-Real-IP $remote_addr;
proxy_set_header X-Forwarded-For $proxy_add_x_forwarded_for;
proxy_set_header X-Forwarded-Proto $scheme;
}
}
```
## **2.CertbotによるSSL認証**
CertbotによりJitsiドメイン専用のSSL証明書を取得します。リバースプロキシサーバのマシン上で以下コマンドを実行します(nginxのコンテナ内)。
```auto
$ docker exec -ti nginx bash
# certbot --nginx -d www.jitsi-example.com
```
certbotにより自動的にnginxの設定ファイルが以下のように更新されます。
```auto
server {
server_name www.jitsi-example.com;
server_tokens off;
# access_log /var/log/nginx/www.jitsi-example.com.access.log;
# error_log /var/log/nginx/www.jitsi-example.com.error.log error;
location / {
proxy_pass http://192.168.xx.xxx:8000;
proxy_set_header Host $host;
proxy_set_header X-Real-IP $remote_addr;
proxy_set_header X-Forwarded-For $proxy_add_x_forwarded_for;
proxy_set_header X-Forwarded-Proto $scheme;
}
listen 443 ssl; # managed by Certbot
ssl_certificate /etc/letsencrypt/live/www.jitsi-example.com/fullchain.pem; # managed by Certbot
ssl_certificate_key /etc/letsencrypt/live/www.jitsi-example.com/privkey.pem; # managed by Certbot
include /etc/letsencrypt/options-ssl-nginx.conf; # managed by Certbot
ssl_dhparam /etc/letsencrypt/ssl-dhparams.pem; # managed by Certbot
}
server {
if ($host = www.jitsi-example.com) {
return 301 https://$host$request_uri;
} # managed by Certbot
server_name www.jitsi-example.com;
listen 80;
return 404; # managed by Certbot
}
```
Let’s Encryptによる証明書の期限は90日のため、cronジョブに更新スクリプトを記述しておきます。
```auto
#certbot in nginx docker
0 1 * * * docker exec nginx bash -c "certbot renew >> /var/log/letsencrypt/renew.log"
```
## **3.Jitsi Meet on Dockerのダウンロード・設定**
Jitsiをインストールするマシンの任意のフォルダ内で最新安定版ブランチをクローン(ダウンロード)
```auto
$ git clone -b stable-4857 --single-branch https://github.com/jitsi/docker-jitsi-meet.git
```
docker-jitsi-meetディレクトリに移動し、 **.env** ファイルを作成します。
```auto
$ cd docker-jitsi-meet
$ cp env.example .env
```
**.env** に書き込むセキュリティを確保するためのパスワードスクリプトを実行します。
```auto
$ ./gen-passwords.sh
```
.envファイルを各々の環境に合わせ変更します。リバースプロキシ経由でSSL接続するため、
**DISABLE\_HTTPS=1**
**#ENABLE\_HTTP\_REDIRECT=1**
とします。以下一部抜粋。
```auto
#
# Basic configuration options
#
# Directory where all configuration will be stored
CONFIG=./.jitsi-meet-cfg
# Exposed HTTP port
HTTP_PORT=8000
# Exposed HTTPS port
#HTTPS_PORT=8443
# System time zone
TZ=JST
# Public URL for the web service
PUBLIC_URL=https://www.jitsi-example.com
# IP address of the Docker host
# See the "Running behind NAT or on a LAN environment" section in the README
DOCKER_HOST_ADDRESS=192.168.x.xx
# Control whether the lobby feature should be enabled or not
ENABLE_LOBBY=1
#
# Let's Encrypt configuration
#
# Enable Let's Encrypt certificate generation
#ENABLE_LETSENCRYPT=0
# Domain for which to generate the certificate
#LETSENCRYPT_DOMAIN=meet.example.com
# E-Mail for receiving important account notifications (mandatory)
#LETSENCRYPT_EMAIL=alice@atlanta.net
#
# Authentication configuration (see handbook for details)
#
# Enable authentication
ENABLE_AUTH=1
# Enable guest access
ENABLE_GUESTS=1
# Select authentication type: internal, jwt or ldap
AUTH_TYPE=internal
#
# Advanced configuration options (you generally don't need to change these)
#
# Disable HTTPS: handle TLS connections outside of this setup
DISABLE_HTTPS=1
# Redirect HTTP traffic to HTTPS
# Necessary for Let's Encrypt, relies on standard HTTPS port (443)
#ENABLE_HTTP_REDIRECT=1
# Container restart policy
# Defaults to unless-stopped
RESTART_POLICY=unless-stopped
```
SSL接続はリバースプロキシにより処理されるため、 **docker-compose.yml** の **- ‘${HTTPS\_PORT}:443’** をコメントアウトします。
```auto
version: '3'
services:
# Frontend
web:
image: jitsi/web:stable-4857
restart: ${RESTART_POLICY}
ports:
- '${HTTP_PORT}:80'
# - '${HTTPS_PORT}:443'
volumes:
- ${CONFIG}/web:/config:Z
- ${CONFIG}/web/letsencrypt:/etc/letsencrypt:Z
- ${CONFIG}/transcripts:/usr/share/jitsi-meet/transcripts:Z
environment:
```
Jitsiシステムの各設定ファイルを格納するディレクトリを作成します。
```auto
mkdir -p .jitsi-meet-cfg/{web/letsencrypt,transcripts,prosody/config,prosody/prosody-plugins-custom,jicofo,jvb,jigasi,jibri}
```
.envファイルを変更した場合、変更内容を反映させるため上記設定ディレクトリを削除後、再度作成する必要が有ります。
## **4.動作確認**
docker-composeコマンドにより、Jitsiシステムの各コンテナを起動します。
```auto
$ docker-compose up -d
```
[https://www.jitsi-example.comにアクセスして動作を確認して下さい](https://www.jitsi-example.xn--com-u63bmdla3jb0cz3ajgngpf3a4811juxegzsl13opr0c)。

**会議オープン画面**

**ホスト画面(カメラ無効時、ホストのみ表示、左側チャットサブ画面表示)**

**YouTube画面共有などのサブメニュー表示**

**アプリ画面共有、ブラウザタブ共有**

**メールによる他メンバー招待**
SIPによる音声による参加、会議録画・ブロードキャスト機能、etherpadによるドキュメントのリアルタイム編集機能については、動作確認出来次第レポートします。
---
### Author:  [@tk-fuse](https://forum.ficusonline.com/u/tk-fuse)
#### Post date: [2025 年 3 月 13 日午前 5:29 UTC](https://forum.ficusonline.com/t/topic/381/2 "2025-03-13T05:29:23Z")
## 最新安定版の導入
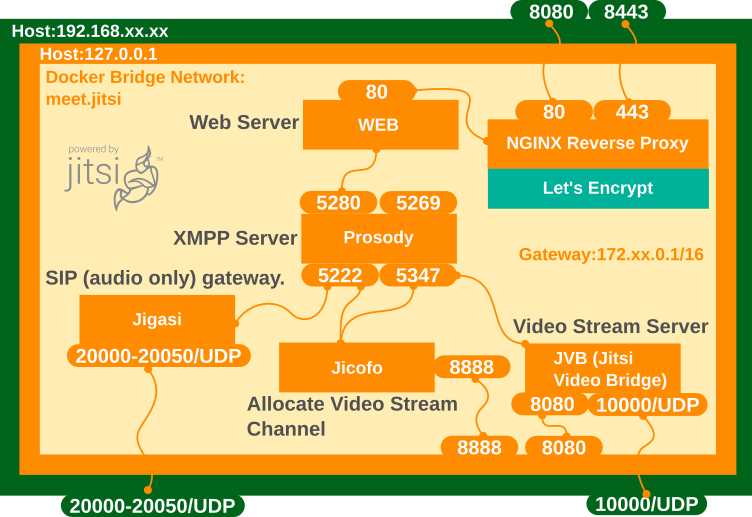
省略していたSIPゲートウェイJigasiコンテナを追加(音声のみ対応)し、最新安定版として再構築。
#### 最新安定版10078-1
> **[Release stable-10078-1 · jitsi/docker-jitsi-meet](https://github.com/jitsi/docker-jitsi-meet/releases/tag/stable-10078-1)**
>
> What's Changed
>
> fix(web) fix generated config syntax by @saghul in #2038
>
> Full Changelog: stable-10078...stable-10078-1
#### Jitsi Docker導入ガイド
> **[Self-Hosting Guide - Docker | Jitsi Meet](https://jitsi.github.io/handbook/docs/devops-guide/devops-guide-docker/)**
>
> Quick start
最新版のダウンロード
```auto
$ wget $(curl -s https://api.github.com/repos/jitsi/docker-jitsi-meet/releases/latest | grep 'zip' | cut -d\" -f4)
```
展開
```auto
$ unzip stable-10078-1
```
環境変数ファイルの作成
```auto
$ cp env.example .env
```
各コンテナ起動時に必要なセキュリティパスワードを.envに設定するスクリプトを実行
```auto
$ ./gen-passwords.sh
```
各コンテナの設定ファイルディレクトリを、展開したディレクトリ内に作成
```auto
$ mkdir -p ~/.jitsi-meet-cfg/{web,transcripts,prosody/config,prosody/prosody-plugins-custom,jicofo,jvb,jigasi,jibri}
```
**注)** このディレクトリを `.env` 内で `CONFIG=./.jitsi-meet-cfg` として指定。
構成ディレクトリ・ファイル一覧
```bash
$ tree -aL 1 ../jitsi-docker-jitsi-meet-10078-1
../jitsi-docker-jitsi-meet-10078-1
├── .env
├── .env.bak
├── .github
├── .gitignore
├── .jitsi-meet-cfg
├── CHANGELOG.md
├── LICENSE
├── Makefile
├── README.md
├── base
├── base-java
├── docker-compose.yml
├── env.example
├── etherpad.yml
├── examples
├── gen-passwords.sh
├── grafana.yml
├── jibri
├── jibri.yml
├── jicofo
├── jigasi
├── jigasi.yml
├── jvb
├── log-analyser
├── log-analyser.yml
├── nginx
├── prometheus
├── prometheus.yml
├── prosody
├── release.sh
├── resources
├── transcriber.yml
├── web
└── whiteboard.yml
```
* * *
### 構成コンテナイメージとポートの確認
- **base** : Debian stable base image with the [S6 Overlay](https://github.com/just-containers/s6-overlay) for process control and the [Jitsi repositories](https://jitsi.org/downloads/) enabled. All other images are based on this one.
- **base-java** : Same as the above, plus Java (OpenJDK).
- **web** : Jitsi Meet web UI, served with nginx.
- **prosody** : [Prosody](https://prosody.im/), the XMPP server.
- **jicofo** : [Jicofo](https://github.com/jitsi/jicofo), the XMPP focus component.
- **jvb** : [Jitsi Videobridge](https://github.com/jitsi/jitsi-videobridge), the video router.
- **jigasi** : [Jigasi](https://github.com/jitsi/jigasi), the SIP (audio only) gateway.
- **jibri** : [Jibri](https://github.com/jitsi/jibri), the broadcasting infrastructure.
* * *
### Prosody
> **[Welcome – Prosody IM](https://prosody.im/)**
>
> Prosody is a Jabber/XMPP server
> written in Lua
[https://prosody.im/doc/ports](https://prosody.im/doc/ports)
| port | interfaces | service |
| --- | --- | --- |
| 5000/tcp | public | [File transfer proxy](https://prosody.im/doc/modules/mod_proxy65) |
| 5222/tcp | public | [Client connections](https://prosody.im/doc/modules/mod_c2s) |
| 5269/tcp | public | [Server-to-server connections](https://prosody.im/doc/modules/mod_s2s) |
| 5280/tcp | private[1](https://prosody.im/doc/ports#fn1) | [HTTP](https://prosody.im/doc/http) |
| 5281/tcp | public | [HTTPS](https://prosody.im/doc/http) |
| 5347/tcp | private | [External components](https://prosody.im/doc/components) |
| 5582/tcp | private | [Telnet console](https://prosody.im/doc/console) |
* * *
### Nginxリバースプロキシ経由の設定
> **[Running behind a reverse proxy - Self-Hosting Guide - Docker | Jitsi Meet](https://jitsi.github.io/handbook/docs/devops-guide/devops-guide-docker/#running-behind-a-reverse-proxy)**
>
> In order to quickly run Jitsi Meet on a machine running Docker and Docker Compose, follow these steps: | Quick start
リバースプロキシでTLS認証を取得するため、WEBコンテナの以下の設定を無効とします。
`.env`
```auto
DISABLE_HTTPS=1
ENABLE_HTTP_REDIRECT=0
ENABLE_LETS_ENCRYPT=0
```
他にも.env内で以下の必要な設定をして下さい。
`.env`
```ini
#
# Basic configuration options
#
# Directory where all configuration will be stored
CONFIG=./.jitsi-meet-cfg
# Exposed HTTP port (will redirect to HTTPS port)
HTTP_PORT=8000
# Exposed HTTPS port
HTTPS_PORT=8443
# System time zone
TZ=JST
# Public URL for the web service (required)
# Keep in mind that if you use a non-standard HTTPS port, it has to appear in the public URL
#PUBLIC_URL=https://test.ficusonline.com:${HTTPS_PORT}
PUBLIC_URL=https://test.ficusonline.com
# Media IP addresses to advertise by the JVB
# This setting deprecates DOCKER_HOST_ADDRESS, and supports a comma separated list of IPs
# See the "Running behind NAT or on a LAN environment" section in the Handbook:
# https://jitsi.github.io/handbook/docs/devops-guide/devops-guide-docker#running-behind-nat-or-on-a-lan-environment
JVB_ADVERTISE_IPS=192.168.1.1,1.2.3.4
# Enable authentication (will ask for login and password to join the meeting)
ENABLE_AUTH=1
# Enable guest access (if authentication is enabled, this allows for users to be held in lobby until registered user lets them in)
ENABLE_GUESTS=1
# Select authentication type: internal, jwt, ldap or matrix
AUTH_TYPE=internal
```
リバースプロキシ経由での接続の場合、WEBコンテナへの接続がHTTPとなるため、ウェブソケット(wss)接続エラーが発生します。コンテナ内ではウェブソケットをws接続とするため、以下Nginxの設定 `location /xmpp-websocket, location /colibri-ws` を追加。
`nginx/default.conf`
```ini
server {
server_name test.ficusonline.com;
server_tokens off;
# access_log /var/log/nginx/test.ficusonline.com.access.log;
# error_log /var/log/nginx/test.ficusonline.com.error.log error;
location / {
proxy_pass http://web:80;
proxy_set_header Host $host;
proxy_set_header X-Real-IP $remote_addr;
proxy_set_header X-Forwarded-For $proxy_add_x_forwarded_for;
proxy_set_header X-Forwarded-Proto $scheme;
}
location /xmpp-websocket {
proxy_pass http://prosody:5280/xmpp-websocket;
proxy_http_version 1.1;
proxy_set_header Upgrade $http_upgrade;
proxy_set_header Connection "upgrade";
}
location /colibri-ws {
proxy_pass http://jvb:8080/colibri-ws;
proxy_http_version 1.1;
proxy_set_header Upgrade $http_upgrade;
proxy_set_header Connection "upgrade";
}
listen 443 ssl; # managed by Certbot
listen [::]:443 ssl;
ssl_certificate /etc/letsencrypt/live/ficusonline.com/fullchain.pem;
ssl_certificate_key /etc/letsencrypt/live/ficusonline.com/privkey.pem;
include /etc/letsencrypt/options-ssl-nginx.conf;
ssl_dhparam /etc/letsencrypt/ssl-dhparams.pem;
}
server {
if ($host = test.ficusonline.com) {
return 301 https://$host$request_uri;
}
server_name test.ficusonline.com;
listen [::]:80;
listen 80;
return 404;
}
```
* * *
Nginx専用のdocker-compose-nginx.ymlを作成
`docker-compose-nginx.yml`
```auto
nginx:
container_name: nginx
image: nginx:alpine
tty: true
ports:
- "8080:80"
- "8443:443"
volumes:
# nginx config
- ./nginx:/etc/nginx/conf.d
- /etc/letsencrypt:/etc/letsencrypt
restart: always
networks:
meet.jitsi:
```
jitsi,nginxのdocker-composeファイルを指定して起動
```auto
$ docker compose -f docker-compose.yml -f docker-compose-nginx.yml up -d
```
* * *
### 管理ユーザの登録
ミーティングの管理ユーザの登録はProsodyコンテナ内で行います。
```auto
$ docker compose exec prosody bash
# prosodyctl --config /config/prosody.cfg.lua register USER_NAME meet.jitsi PASSWORD
```
登録ユーザの確認
```auto
# find /config/data/meet%2ejitsi/accounts -type f -exec basename {} .dat \;
```
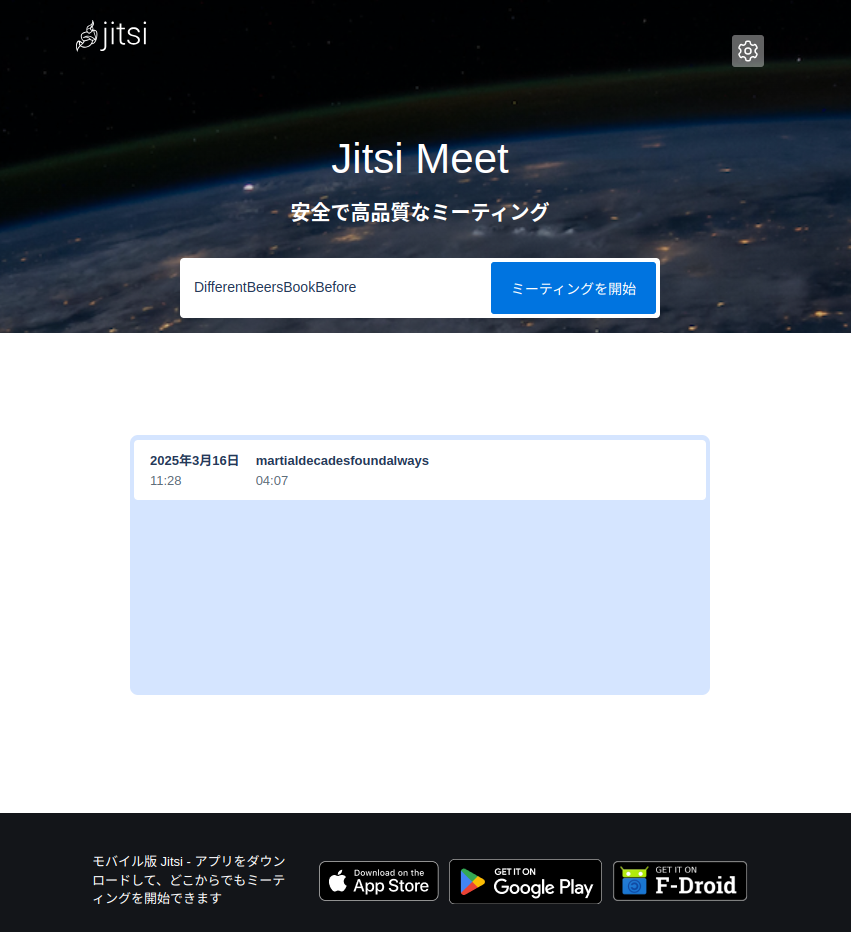
Jitsiメイン画面
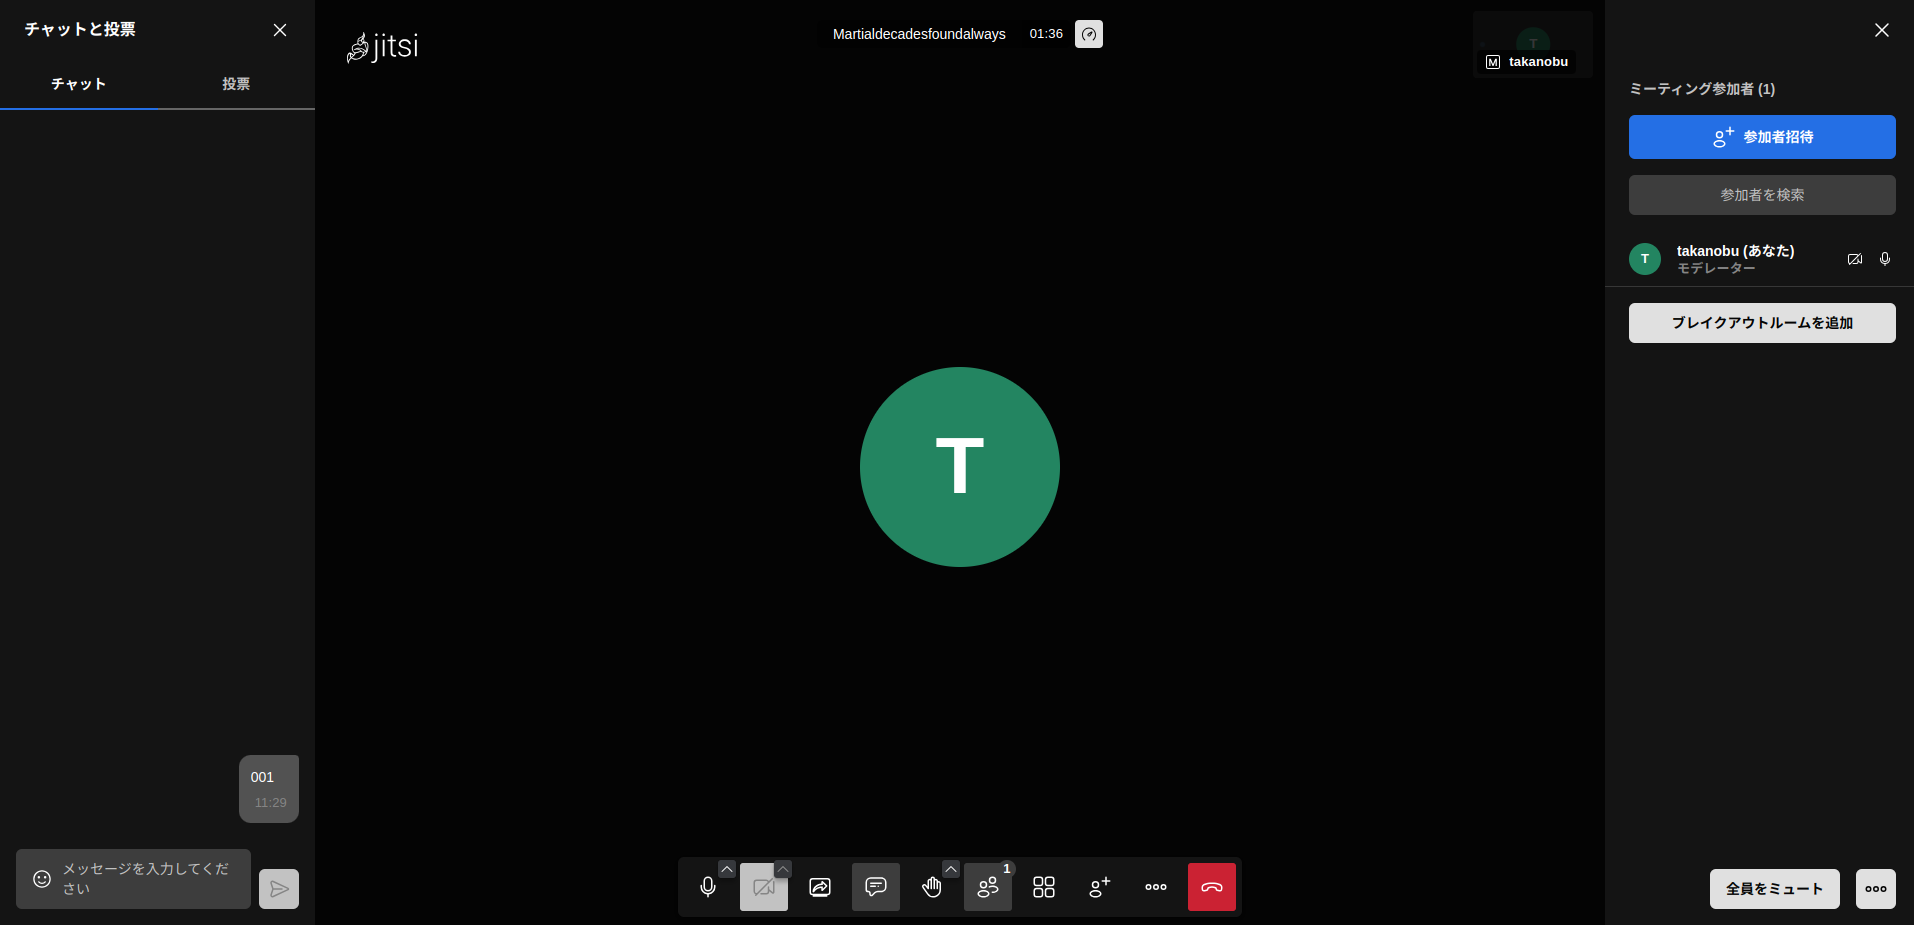
ミーティング画面
---
### Author:  [@tk-fuse](https://forum.ficusonline.com/u/tk-fuse)
#### Post date: [2025 年 3 月 19 日午前 7:50 UTC](https://forum.ficusonline.com/t/topic/381/3 "2025-03-19T07:50:17Z")
## トラブルシュート
### Jitsi on Podman
>
>
> Hello
>
> I know podman is \[not supported\](https://github.com/jitsi/docker-jitsi-…meet/issues/201), but we have been running jitsi in podman flawlessly for a long time.
> The fix to \[nginx resolver\](https://github.com/jitsi/docker-jitsi-meet/commit/53b265455661fe0a6fc986ad589d6ecfd911847c) was very much needed for podman to continue working (thank you!).
>
> After upgrading to 8044, I was surprised to find jitsi-meet still could not resolve the prosody server name in nginx internal resolver.
> I found a new error in Nginx logs : \`unexpected A record in DNS response\` and figured it was expecting another type of DNS record (AAAA?).
>
> The containers in podman now have full IPv6 support (even when not using it, the containers have a fe80:: Link-local IPv6 address) and it changes nginx behaviour while resolving DNS names.
>
> We resolved this by adding \`ipv6=off\` to the resolver configuration in https://github.com/jitsi/docker-jitsi-meet/blob/c44c59e6cb5ccdadfe0e710b7c649545fb5904a8/web/rootfs/defaults/nginx.conf#L30
>
> This is the first time we had to alter the image building process to make docker-jitsi-meet work with podman.
> Would you consider adding \`ipv6=off\` to your nginx.conf template file? I don't think it will break any docker configuration.
>
> Thank you
* * *
### Podman:コンテナ名での相互接続について
>
>
> I personally prefer using https://podman.io instead of Docker (because container…s dont' run as root, on the host; although you can still be root inside the container..), and when I tried that with this project (FYI they have a \`podman-compose\` which, in my experience, is reasonably compatible with \`docker-compose\`) but I've noticed that the images of this project don't yet work with Podman instead of Docker. The web container for example failed with the error below (I hadn't even checked the others.)
>
> The short-term workaround is, of course, to just use Docker instead of Podman for now, but I thought I'd at least just let you know about this by filing this issue here.
>
> Glancing over this project, I've noticed open PRs #192 and #126, it's possible they help with this.
>
> @saghul more of an FYI
>
> \`\`\`
> \[s6-init\] making user provided files available at /var/run/s6/etc...
> \[s6-init\] ensuring user provided files have correct perms...
> \[fix-attrs.d\] applying ownership & permissions fixes...
> \[fix-attrs.d\] done.
> \[cont-init.d\] executing container initialization scripts...
> \[cont-init.d\] 01-set-timezone: executing...
> \[cont-init.d\] 01-set-timezone: exited 0.
> \[cont-init.d\] 10-config: executing...
> mkdir: cannot create directory '/config/nginx': Permission denied
> mkdir: cannot create directory '/config/keys': Permission denied
> generating self-signed keys in /config/keys, you can replace these with your own keys if required
> Generating a RSA private key
> ........................++++
> ....................................................................................................++++
> writing new private key to '/config/keys/cert.key'
> req: Can't open "/config/keys/cert.key" for writing, No such file or directory
> Can't open /config/nginx/dhparams.pem for writing, No such file or directory
> 140389928026176:error:02001002:system library:fopen:No such file or directory:../crypto/bio/bss\_file.c:74:fopen('/config/nginx/dhparams.pem','w')
> 140389928026176:error:2006D080:BIO routines:BIO\_new\_file:no such file:../crypto/bio/bss\_file.c:81:
> cp: cannot create regular file '/config/nginx/nginx.conf': No such file or directory
> /var/run/s6/etc/cont-init.d/10-config: line 44: /config/nginx/meet.conf: No such file or directory
> /var/run/s6/etc/cont-init.d/10-config: line 48: /config/nginx/ssl.conf: No such file or directory
> /var/run/s6/etc/cont-init.d/10-config: line 52: /config/nginx/site-confs/default: No such file or directory
> cp: cannot create regular file '/config/config.js': Permission denied
> sed: can't read /config/config.js: No such file or directory
> cp: cannot create regular file '/config/interface\_config.js': Permission denied
> sed: can't read /config/interface\_config.js: No such file or directory
> \[cont-init.d\] 10-config: exited 2.
> \[cont-init.d\] done.
> \[services.d\] starting services
> \[services.d\] done.
> nginx: \[emerg\] open() "/config/nginx/nginx.conf" failed (2: No such file or directory)
> nginx: \[emerg\] open() "/config/nginx/nginx.conf" failed (2: No such file or directory)
> \`\`\`
* * *
### PodmanでのWSエラー
>
>
> I have a standard Jitsi Meet Docker stable-6433 setup. I have problem with WebSo…cket connection. I do not have error in Jist web container.
>
> I'd greatly appreciate any pointers to help fix the issue.
>
> Jitsi Web Logs:
> \`\`\`
> "GET /xmpp-websocket?room=test HTTP/1.1" 403 284 "-" "Mozilla/5.0 (Windows NT 10.0; Win64; x64) AppleWebKit/537.36 (KHTML, like Gecko) Chrome/95.0.4638.69 Safari/537.36"
> \`\`\`
> Chrome screenshot
> !\[image\](https://user-images.githubusercontent.com/3583526/143402494-04c819d1-e64c-47e9-a3bf-6cc479dc09f1.png)
---
### Author:  [@tk-fuse](https://forum.ficusonline.com/u/tk-fuse)
#### Post date: [2025 年 3 月 20 日午前 11:25 UTC](https://forum.ficusonline.com/t/topic/381/4 "2025-03-20T11:25:00Z")
## Podmanでpodを作成して起動
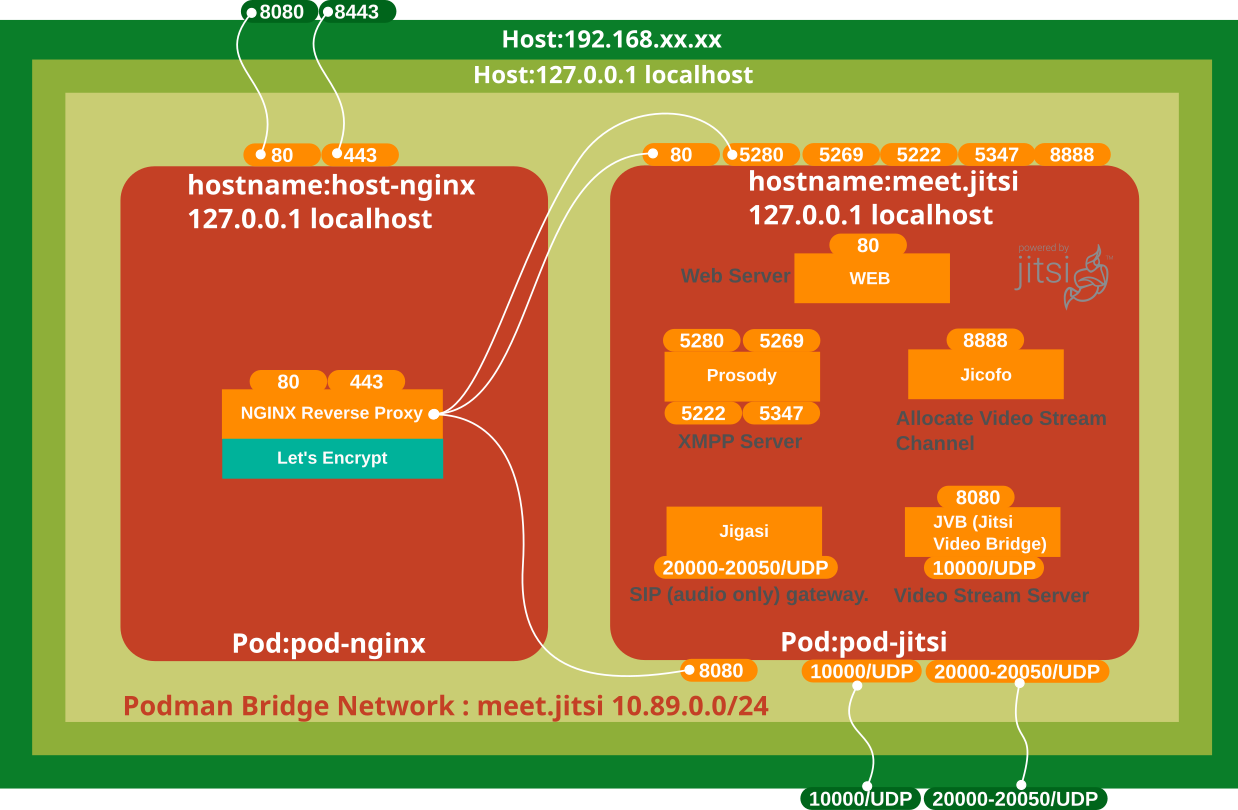
nginxのproxy\_passの設定をpodmanのネットワークに合わせて書換えます。
`nginx/default.conf`
```ini
server {
server_name test.ficusonline.com;
server_tokens off;
# access_log /var/log/nginx/test.ficusonline.com.access.log;
# error_log /var/log/nginx/test.ficusonline.com.error.log error;
location / {
# jitsi-meet network 172.18.0.0/16
# web container
# proxy_pass http://web:80/;
proxy_pass http://meet.jitsi:80/;
proxy_set_header Host $host;
proxy_set_header X-Real-IP $remote_addr;
proxy_set_header X-Forwarded-For $proxy_add_x_forwarded_for;
proxy_set_header X-Forwarded-Proto $scheme;
}
location /xmpp-websocket {
# prosody ws
# proxy_pass http://prosody:5280/xmpp-websocket;
proxy_pass http://meet.jitsi:5280/xmpp-websocket;
proxy_http_version 1.1;
proxy_set_header Upgrade $http_upgrade;
proxy_set_header Connection "upgrade";
}
location /colibri-ws {
# jvb ws
# proxy_pass http://jvb:8080/colibri-ws;
proxy_pass http://meet.jitsi:8080/colibri-ws;
proxy_http_version 1.1;
proxy_set_header Upgrade $http_upgrade;
proxy_set_header Connection "upgrade";
}
listen 443 ssl; # managed by Certbot
listen [::]:443 ssl;
ssl_certificate /etc/letsencrypt/live/ficusonline.com/fullchain.pem;
ssl_certificate_key /etc/letsencrypt/live/ficusonline.com/privkey.pem;
include /etc/letsencrypt/options-ssl-nginx.conf;
ssl_dhparam /etc/letsencrypt/ssl-dhparams.pem;
}
server {
if ($host = test.ficusonline.com) {
return 301 https://$host$request_uri;
}
server_name test.ficusonline.com;
listen [::]:80;
listen 80;
return 404;
}
```
Podmanによるネットワークの作成、Podの作成、コンテナをPod内に配置する一連のコマンドは以下の通りです。
```shell
$ JITSI_IMAGE_VERSION=stable-10078-1
$ podman network create meet-jitsi
$ podman pod create --name pod-nginx --hostname host-nginx --network meet-jitsi -p 8080:80 -p 8443:443
$ podman pod create --name pod-jitsi --hostname meet.jitsi --network meet-jitsi -p 10000:10000/udp -p 20000-20050:20000-20050/udp \
--add-host=xmpp.meet.jitsi:127.0.0.1
$ podman create \
--pod pod-nginx \
--name nginx \
-v ./nginx:/etc/nginx/conf.d \
-v ./letsencrypt:/etc/letsencrypt \
nginx:alpine
$ podman create \
--name web \
--pod pod-jitsi \
--env-file .env \
-v .jitsi-meet-cfg/web:/config:Z \
-v .jitsi-meet-cfg/web/crontabs:/var/spool/cron/crontabs:Z \
-v .jitsi-meet-cfg/transcripts:/usr/share/jitsi-meet/transcripts:Z \
-v .jitsi-meet-cfg/web/load-test:/usr/share/jitsi-meet/load-test:Z \
--label service=jitsi-web \
jitsi/web:${JITSI_IMAGE_VERSION}
$ podman create \
--name prosody \
--pod pod-jitsi \
--env-file .env \
-v .jitsi-meet-cfg/prosody/config:/config:Z \
-v .jitsi-meet-cfg/prosody/prosody-plugins-custom:/prosody-plugins-custom:Z \
--label service="jitsi-prosody" \
jitsi/prosody:${JITSI_IMAGE_VERSION}
$ podman create \
--name jicofo \
--pod pod-jitsi \
--env-file .env \
-v .jitsi-meet-cfg/jicofo:/config:Z \
--label service="jitsi-jicofo" \
jitsi/jicofo:${JITSI_IMAGE_VERSION}
$ podman create \
--name jvb \
--pod pod-jitsi \
--env-file .env \
-v .jitsi-meet-cfg/jvb:/config:Z \
--label service="jitsi-jvb" \
jitsi/jvb:${JITSI_IMAGE_VERSION}
$ podman create \
--name jigasi \
--pod pod-jitsi \
--env-file .env \
-v .jitsi-meet-cfg/jigasi:/config:Z \
--label service="jitsi-jigasi" \
jitsi/jigasi:${JITSI_IMAGE_VERSION}
```
これでPodmanデスクトップで以下のように管理できるので、Kubernetesへの移行も簡単に行えるようになります。
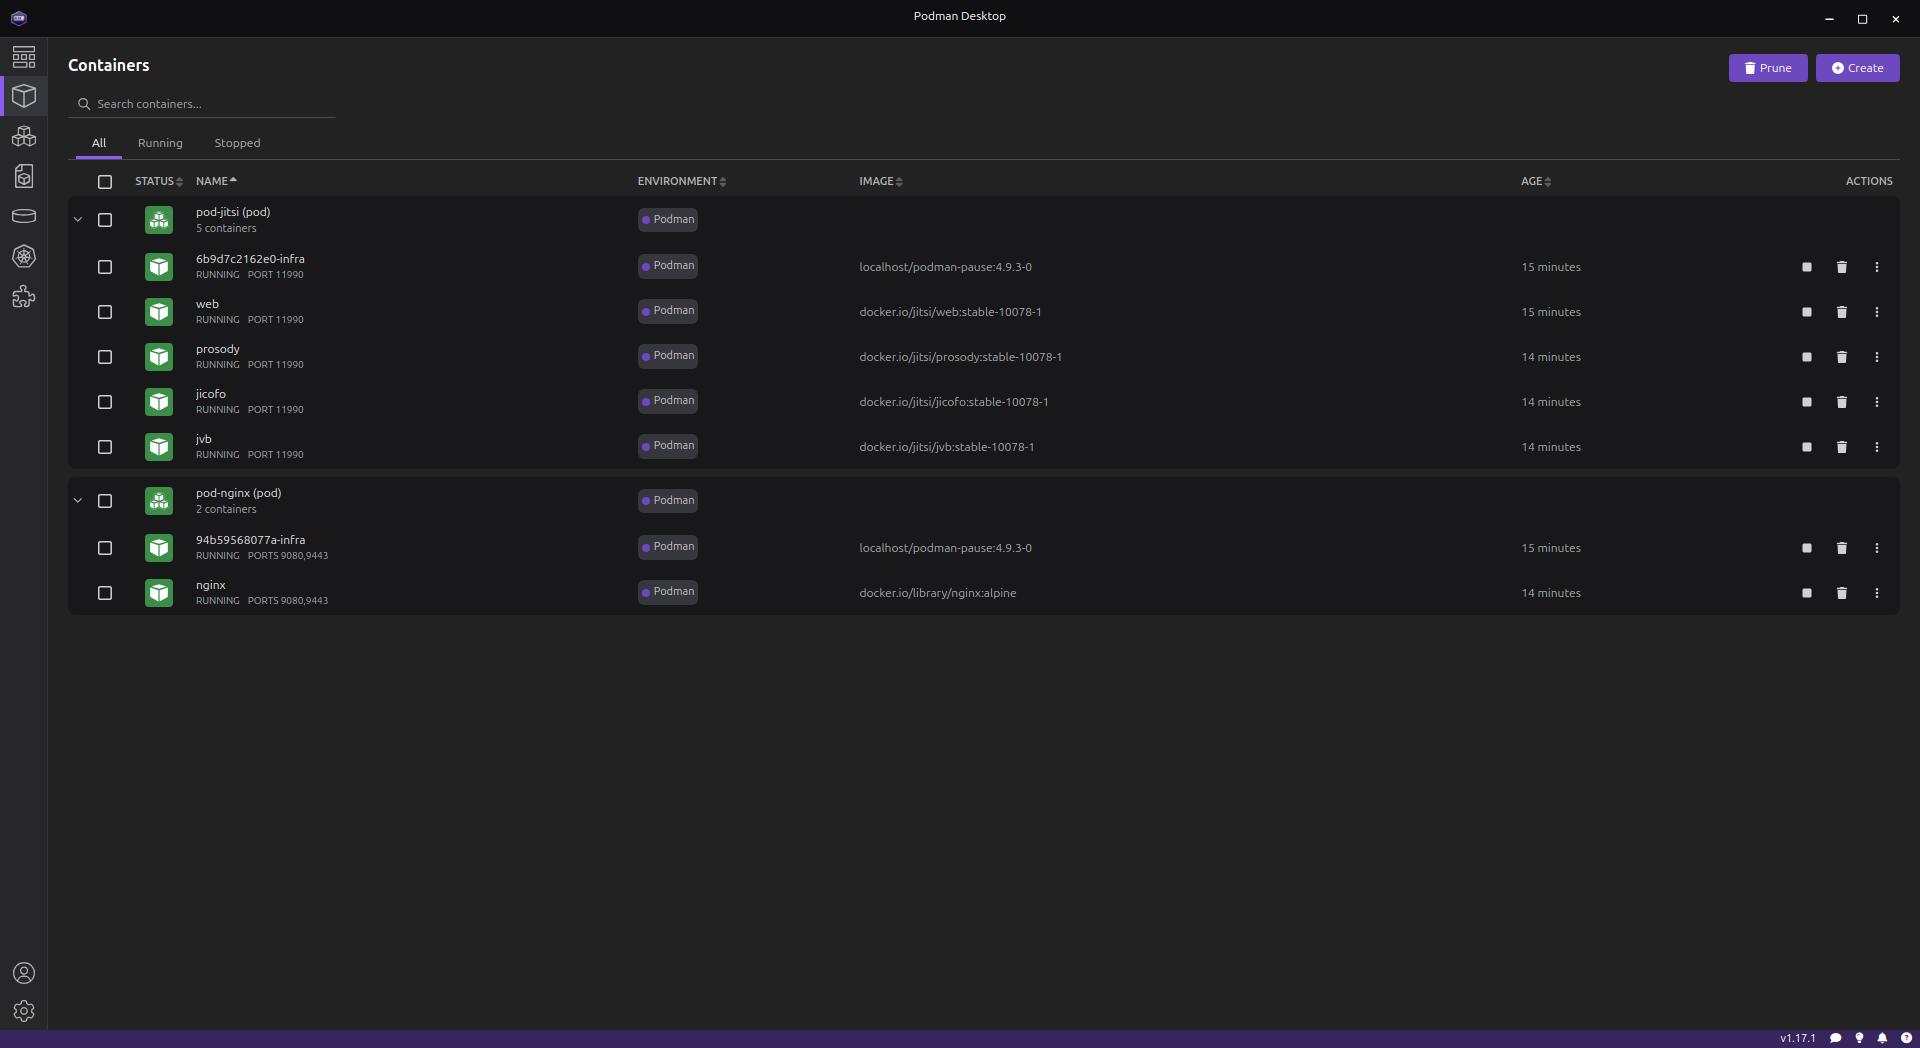
Podmanのルートレスモードを活用することで、セキュリティを強化しつつ、サーバ負荷に応じた柔軟なスケーリングが可能になるため、Dockerに加えてPodmanによるシステム設計も検討していきます。
---
### Author:  [@tk-fuse](https://forum.ficusonline.com/u/tk-fuse)
#### Post date: [2025 年 3 月 28 日午前 2:55 UTC](https://forum.ficusonline.com/t/topic/381/5 "2025-03-28T02:55:49Z")
## Kubernetes環境へ移行するための前準備として
Podmanで作成したPodからKubernetesのyamlファイルを作成します。
```shell
$ podman generate kube pod-nginx >> pod-nginx.yaml
$ podman generate kube pod-jitsi >> pod-jitsi.yaml
```
pod-jitsi.yamlから
metadata → annotations を削除します。
>
>
> \### Issue Description
>
> Only one \*SOURCE-VOLUME\* gets referenced within the \`bind…-mount-options\` entry in the Kubernetes YAML files generated using \`podman kube generate\`, even though there might be several more defined for the individual containers within the pod.
>
> Looking at the code, this seems to be by design. However I think this behaviour might worth a short explanation in the documentation at least, as it might not be obvious for all users.
>
> \### Steps to reproduce the issue
>
> 1.
> \`\`\`
> podman pod create --name example
> podman create --pod example --name container\_1 --volume /tmp/ex\_1:/tmp/1:Z quay.io/podman/hello
> podman create --pod example --name container\_2 --volume /tmp/ex\_2:/tmp/2:Z quay.io/podman/hello
> podman create --pod example --name container\_3 --volume /tmp/ex\_3:/tmp/3:Z quay.io/podman/hello
> \`\`\`
> 2. \`podman kube generate example\`
>
> \### Describe the results you received
>
> The \`metadata\` section looks like:
>
> \`\`\`
> \# ...
> metadata:
> annotations:
> bind-mount-options: /tmp/ex\_3:Z
> \# ...
> \`\`\`
>
> \### Describe the results you expected
>
> \- \`/tmp/ex\_1:Z\`
> \- \`/tmp/ex\_2:Z\`
>
> should have appeared somewhere as well. \`bind-mount-options\` metadata pertaining to these mounts seems to be lost.
>
> \### podman info output
>
> \`\`\`yaml
> N/A
> \`\`\`
>
>
> \### Podman in a container
>
> No
>
> \### Privileged Or Rootless
>
> None
>
> \### Upstream Latest Release
>
> Yes
>
> \### Additional environment details
>
> \_No response\_
>
> \### Additional information
>
> \_No response\_
`pod-jitsi.yaml`
```auto
apiVersion: v1
kind: Pod
metadata:
creationTimestamp: "2025-03-27T14:17:48Z"
labels:
app: pod-jitsi
name: pod-jitsi
.....
.....
```
作成したKubernetesのyamlファイルからPodを起動
```shell
$ podman play kube pod-jitsi.yaml
$ podman play kube pod-nginx.yaml
```
Podが起動するまでのログを確認する場合
```shell
$ podman --log-level=debug play kube pod-jitsi.yaml
$ podman --log-level=debug play kube pod-nginx.yaml
```
---
### Author:  [@tk-fuse](https://forum.ficusonline.com/u/tk-fuse)
#### Post date: [2025 年 3 月 30 日午前 4:40 UTC](https://forum.ficusonline.com/t/topic/381/6 "2025-03-30T04:40:36Z")
## システムデーモンで管理(自動起動)
Podをシステムデーモンのサービスとして登録することで、ユーザログイン時、またはホストマシン起動時に自動起動することができます。
システムデーモンを利用する方法として以下の2つが提供されています。
#### 1) $ podman generate systemd ~
既存のポッド、コンテナからsystemdユニットファイルを生成しますが、あくまで既存のポッドやコンテナを起動・停止するサービスのため、ポッドやコンテナを削除するとサービスは無効になります。機能的には、docker-composeのstop,startに相当します。
#### 2) Quadlet(推奨)
既存のコンテナ定義を参照して、イメージから新規にコンテナを起動するsystemdユニットファイルを生成します(既存のコンテナに依存しません)。サービスを停止するとコンテナは削除されます。機能的にはdocker-composeのup,downに相当します。 **注)** Podman v4.9.3時点では、ポッドとコンテナの連携機能が未実装(v5以降で対応)
* * *
#### 1) $ podman generate systemd ~
Podの確認
```auto
$ podman pod ps
POD ID NAME STATUS CREATED INFRA ID # OF CONTAINERS
8479ea3524b9 pod-jitsi Exited 4 hours ago de6fb0a4d245 5
7787d93bd426 pod-nginx Exited 4 hours ago 20552d55e11c 2
```
各Podの管理をシステムデーモンに受け渡します。そのためのサービスファイルをpodman generate コマンドで作成します。
```shell
$ podman generate systemd --name pod-nginx --files
```
以下の2つのファイルが作成されます。
> pod-pod-nginx.service
> container-nginx.service
```shell
$ podman generate systemd --name pod-jitsi --files
```
以下の6つのファイルが作成されます。
> pod-pod-jitsi.service
> container-web.service
> container-prosody.service
> container-jicofo.service
> container-jvb.service
> container-jigasi.service
作成された上記ファイルを、ユーザレベルでシステムデーモンで管理する場合には、`~/.config/systemd/user` ディレクトリへコピーして下さい。
```shell
$ cp *.service ~/.config/systemd/user
```
各サービスの有効化
```auto
$ systemctl --user daemon-reload
$ systemctl --user enable pod-pod-jitsi
$ systemctl --user enable pod-pod-nginx
```
サービスの起動
```shell
$ systemctl --user start pod-pod-jitsi
$ systemctl --user start pod-pod-nginx
```
上記の方法では、ユーザがログインする時のみ有効なので、ユーザログインに関係なく起動するには、以下の設定をして下さい。
```auto
$ sudo loginctl enable-linger $(whoami)
```
> **[systemctl enable \ - 15.2. systemd サービスの有効化 | コンテナーの構築、実行、および管理 | Red...](https://docs.redhat.com/ja/documentation/red_hat_enterprise_linux/9/html/building_running_and_managing_containers/proc_enabling-systemd-services_assembly_porting-containers-to-systemd-using-podman#proc_enabling-systemd-services_assembly_porting-containers-to-systemd-using-podman)**
>
> サービスの有効化には、さまざまなオプションがあります。 | 15.2. systemd サービスの有効化 | コンテナーの構築、実行、および管理 | Red Hat Enterprise Linux | 9 | Red Hat Documentation