# Podman (Podman Desktop) 導入
**URL:** https://forum.ficusonline.com/t/topic/525
**Category:** Server
**Created:** [2025 年 3 月 17 日午前 7:37 UTC](https://forum.ficusonline.com/t/topic/525 "2025-03-17T07:37:32Z")
**Posts on this page:** 8
**Page:** 1
### Author:  [@tk-fuse](https://forum.ficusonline.com/u/tk-fuse)
#### Post date: [2025 年 3 月 17 日午前 7:37 UTC](https://forum.ficusonline.com/t/topic/525/1 "2025-03-17T07:37:32Z")
> **[GitHub - containers/podman: Podman: A tool for managing OCI containers and...](https://github.com/containers/podman)**
>
> Podman: A tool for managing OCI containers and pods.
**Podman** ( **POD Manager** )は、Linuxコンテナの管理ツールで、Dockerと同様にOCI(Open Container Initiative)標準のコンテナを作成、管理、実行できるオープンソースのソフトウェアです。特に、 **rootless** (非特権ユーザー)モードや **システムデーモン不要** という特徴があります。
### Podmanの特徴
1. **デーモンレス (Daemonless)**
- PodmanはDockerとは異なり、デーモンを使用せずに直接プロセスとしてコンテナを起動します。
- 各コンテナは独立したプロセスとして動作するため、デーモンのクラッシュによるダウンタイムのリスクがありません。
1. **Rootless(非特権ユーザー)モード**
- 一般ユーザー権限でコンテナを作成・管理できます。これにより、 **セキュリティが向上** し、システム全体に影響を与えるリスクを軽減できます。ルートレスモードとルートモードで読み込む設定ファイルが異なるため、必要に応じ使い分ける必要があります。
1. **Docker互換性**
- PodmanのコマンドはDocker CLIとほぼ同様です。
例:
- `alias docker=podman` とすることで、ほとんどのDockerコマンドがPodmanで動作します。
1. **システムユニットとの統合**
- `podman generate systemd` コマンドを使用することで、コンテナをSystemdサービスとして登録し、ブート時の自動起動が可能です。
1. **セキュリティ**
- Podmanは`SELinux`や`seccomp`、`AppArmor`などのセキュリティ機能と連携し、強固な隔離環境を実現します。
1. **Kubernetes対応**
- PodmanはKubernetes YAMLマニフェストをそのまま使用できます。
- `podman play kube` コマンドにより、Kubernetes形式のYAMLからコンテナの起動が可能です。
1. **イメージ管理**
- PodmanはDocker HubやQuay.ioなどのレジストリからOCIコンテナイメージを取得し、管理できます。
* * *
### podmanのインストール
[https://www.howtoforge.com/how-to-install-podman-on-ubuntu-22-04/](https://www.howtoforge.com/how-to-install-podman-on-ubuntu-22-04/)
```shell
$ sudo apt install podman -y
$ podman -v
podman version 4.9.3
```
デフォルトではコンテナイメージの取得先が設定されていないので、以下のファイルで取得先を指定します。
`/etc/containers/registries.conf`
```ini
[registries.search]
registries=["registry.access.redhat.com", "registry.fedoraproject.org", "docker.io"]
```
dockerをpodmanに置き換えることで、ほぼ従来どおりの操作が可能です。
debianイメージのリストアップ
```shell
$ podman search debian
NAME DESCRIPTION
docker.io/library/debian Debian is a Linux distribution that's compos...
docker.io/dockette/debian My Debian Sid | Jessie | Wheezy Base Images
docker.io/corpusops/debian debian corpusops baseimage
docker.io/treehouses/debian
docker.io/rootpublic/debian
docker.io/debian/snapshot "debian", but with sources.list pointing to...
docker.io/debian/eol End of Life Debian versions (pointing at arc...
docker.io/vulhub/debian
docker.io/debian/buildd https://hub.docker.com/_/debian/ but --varia...
docker.io/voxpupuli/debian
docker.io/debian/archvsync
docker.io/smartentry/debian debian with smartentry
docker.io/i386/debian Debian is a Linux distribution that's compos...
docker.io/amd64/debian Debian is a Linux distribution that's compos...
docker.io/arm64v8/debian Debian is a Linux distribution that's compos...
docker.io/arm32v7/debian Debian is a Linux distribution that's compos...
docker.io/telkomindonesia/debian All-in-One Debian (9.x) Base Image Repositor...
docker.io/arm32v5/debian Debian is a Linux distribution that's compos...
docker.io/s390x/debian Debian is a Linux distribution that's compos...
docker.io/ppc64le/debian Debian is a Linux distribution that's compos...
docker.io/mips64le/debian Debian is a Linux distribution that's compos...
docker.io/32bit/debian Debian for i386 (32bit)
docker.io/dalaobanniubi/debian
docker.io/vptech/debian Docker images of Debian.
docker.io/dj0x/debian GNU/Debian-Git-ssh
```
debianイメージのダウンロード
```shell
$ podman pull debian
Resolved "debian" as an alias (/etc/containers/registries.conf.d/shortnames.conf)
Trying to pull docker.io/library/debian:latest...
Getting image source signatures
Copying blob 155ad54a8b28 done |
Copying config d4ccddb816 done |
Writing manifest to image destination
d4ccddb816ba27eaae22ef3d56175d53f47998e2acb99df1ae0e5b426b28a076
```
イメージ確認
```shell
$ podman images
REPOSITORY TAG IMAGE ID CREATED SIZE
docker.io/library/debian latest d4ccddb816ba 3 weeks ago 121 MB
```
上記debianイメージからコンテナ起動
```shell
$ podman run -dit --name debian-container debian
f9782c009da00e4e521fd395551acc5491c207e957b8c949c26e53813df668ae
```
プロセス確認
```shell
$ podman ps
CONTAINER ID IMAGE COMMAND CREATED STATUS PORTS NAMES
f9782c009da0 docker.io/library/debian:latest bash 6 seconds ago Up 6 seconds debian-container
```
コンテナ内へアクセス(lsコマンド)
```auto
$ podman attach debian-container
# ls
bin boot dev etc home lib lib64 media mnt opt proc root run sbin srv sys tmp usr var
```
* * *
### アンインストール
イメージの削除
```shell
$ podman image prune --all
```
```shell
$ sudo apt remove --purge -y podman
$ sudo apt autoremove -y
$ sudo rm -rf ~/.config/containers ~/.local/share/containers /etc/containers /var/lib/containers
```
---
### Author:  [@tk-fuse](https://forum.ficusonline.com/u/tk-fuse)
#### Post date: [2025 年 3 月 17 日午前 9:15 UTC](https://forum.ficusonline.com/t/topic/525/2 "2025-03-17T09:15:20Z")
## Podmanデスクトップ
> **[Podman Desktop - Containers and Kubernetes | Podman Desktop](https://podman-desktop.io/)**
>
> Podman Desktop - An open source graphical tool for developing on containers and Kubernetes
> **[Introduction | Podman Desktop](https://podman-desktop.io/tutorial)**
>
> Introduction to the tutorials section
AMD64 binary(tar.gz)をダウンロード
任意のディレクトリで展開

展開したフォルダ内のpodman-desktopを起動
案内に従いkubectl,composeをインストール

> **[Create a pod | Podman Desktop](https://podman-desktop.io/docs/containers/creating-a-pod)**
>
> Creating a pod from selected containers.
---
### Author:  [@tk-fuse](https://forum.ficusonline.com/u/tk-fuse)
#### Post date: [2025 年 3 月 18 日午前 7:40 UTC](https://forum.ficusonline.com/t/topic/525/3 "2025-03-18T07:40:43Z")
## トラブルシューティング
>
* * *
**リセット**
```shell
# podman system reset --force
```
This will delete all of your images, containers, and custom networks.
**イメージの削除**
```shell
$ rm -rf ~/.local/share/containers
$ sudo rm -rf /var/lib/containers
```
**設定ファイルの削除**
```shell
$ rm -f ~/.config/containers/{storage.conf,libpod.conf}
$ sudo rm -f /usr/share/containers/{storage.conf,libpod.conf}
```
* * *
### AppArmor the issue?
> **[Container permission denied: How to diagnose this error](https://www.redhat.com/en/blog/container-permission-denied-errors)**
>
> Over the years, I have often given a talk using the story of Goldilocks and the Three Bears and how it compares to container security.
AppArmor is similar to SELinux in that rules are added to the kernel to control process access to the system. Like SELinux, AppArmor could cause a permission-denied error. You can verify whether it is the problem by turning off AppArmor separation:
```shell
$ podman run --security-opt apparmor=unconfined …
```
Our team has heard of [cases](https://github.com/containers/podman/issues/8575) where `unconfined` is still not working. You can try disabling the `apparmor` profile or AppArmor itself.
> **[AppArmor](https://ubuntu.com/server/docs/how-to/security/apparmor/)**
>
> AppArmor is an easy-to-use Linux Security Module implementation that restricts applications’ capabilities and permissions with profiles that are set per-program. It provides mandatory access contro...
* * *
### ルートレスモードの制限事項
>
* * *
### ソケットエラー
podman composeコマンドを実行する場合、ルートレスモードでは直接CLIを実行する権限が制限されているため、API (`podman.sock`) を介して制御する仕組みとなっています。デフォルトでは、このAPIを使用する設定となっていないため、このエラーが発生します。
> Cannot connect to the Docker daemon at unix:///run/user/1000/podman/podman.sock. Is the docker daemon running?
> **[rootless podman cannot build with docker-compose build · containers podman ·...](https://github.com/containers/podman/discussions/16338)**
>
> trying to build images rootless using podman - build fails with error DOCKER\_BUILDKIT=0 docker-compose -f docker-compose-prod.yml build ERRO\[0000\] Can't add file /home/usernm/localdirectorypath/pac...
> **[27.2. ルートレスモードで systemd を使用した Podman API の有効化 | コンテナーの構築、実行、および管理 | Red Hat...](https://docs.redhat.com/ja/documentation/red_hat_enterprise_linux/9/html/building_running_and_managing_containers/enabling-the-podman-api-using-systemd-in-rootless-mode_using-the-container-tools-api#enabling-the-podman-api-using-systemd-in-rootless-mode_using-the-container-tools-api)**
>
> systemd を使用して、Podman API ソケットと Podman API サービスをアクティベートできます。 | 27.2. ルートレスモードで systemd を使用した Podman API の有効化 | コンテナーの構築、実行、および管理 | Red Hat Enterprise Linux | 9 | Red Hat Documentation
podman.sockを使用:ユーザモードで実行(DOCKE\_HOSTの設定は必要ないかもしれません)
```auto
$ export DOCKER_HOST=unix://$XDG_RUNTIME_DIR/podman/podman.sock
$ systemctl enable --now --user podman.socket
```
解除
```auto
$ unset DOCKER_HOST
$ systemctl --user disable podman.socket
```
Podman-Desktopを起動して終了後、podman.socketは消滅するため
podman.socketが必要なケースでは下記エラーが発生します。
> #### ‘/run/user/1000/podman/podman.sock’ にアクセスできません: そのようなファイルやディレクトリはありません
その場合はpodman.socketを再起動します。
```shell
$ systemctl restart --user podman.socket
$ ls -l /run/user/$(id -u)/podman/podman.sock
srw-rw---- 1 takanobu takanobu 0 5月 15 13:31 /run/user/1000/podman/podman.sock
```
---
### Author:  [@tk-fuse](https://forum.ficusonline.com/u/tk-fuse)
#### Post date: [2025 年 3 月 19 日午後 2:25 UTC](https://forum.ficusonline.com/t/topic/525/4 "2025-03-19T14:25:55Z")
## ネットワーク
> **[Configuring container networking with Podman](https://www.redhat.com/en/blog/container-networking-podman)**
>
> Podman uses two different means for its networking stack, depending on whether the container is rootless or rootfull. When rootfull, defined as being run by ...
>
[podman-network-create — Podman documentation](https://docs.podman.io/en/latest/markdown/podman-network-create.1.html)
**podman network create** [_options_] [_name_]
Create a network with a static **ipv4** and **ipv6** subnet and set a gateway.
```auto
$ podman network create --subnet 192.168.55.0/24 --gateway 192.168.55.3 --subnet fd52:2a5a:747e:3acd::/64 --gateway fd52:2a5a:747e:3acd::10 podman4
```
* * *
### Linuxの特権ポート(1024未満)にルートレスモードのコンテナをバインドする方法
[https://linuxconfig.org/how-to-bind-a-rootless-container-to-a-privileged-port-on-linux](https://linuxconfig.org/how-to-bind-a-rootless-container-to-a-privileged-port-on-linux)
注)上記のルールではOUTPUTに追加しているが、PREROUTINGに追加。
#### 1 : nftablesでポートリダイレクトルールを追加
```shell
$ sudo iptables -t nat -A PREROUTING -p tcp --dport 80 -j REDIRECT --to-port 8080
$ sudo ip6tables -t nat -A PREROUTING -p tcp --dport 80 -j REDIRECT --to-port 8080
$ sudo iptables -t nat -A PREROUTING -p tcp --dport 443 -j REDIRECT --to-port 8443
$ sudo ip6tables -t nat -A PREROUTING -p tcp --dport 443 -j REDIRECT --to-port 8443
```
注)ufwを使用している場合、ufwはiptables-nft(iptables)をバックエンドで使用しているためiptablesコマンドを使用すること。
ルールの確認(# handle:ハンドル番号の表示)これはnftでも可。
```shell
$ sudo nft -a list table ip nat
.....
.....
chain PREROUTING { # handle 2
type nat hook prerouting priority dstnat; policy accept;
fib daddr type local counter packets 0 bytes 0 jump DOCKER # handle 3
tcp dport 80 counter packets 0 bytes 0 redirect to :8080 # handle 44
tcp dport 443 counter packets 0 bytes 0 redirect to :8443 # handle 45
}
.....
.....
$ sudo nft -a list table ip6 nat
.....
.....
chain PREROUTING { # handle 2
type nat hook prerouting priority dstnat; policy accept;
fib daddr type local counter packets 6681 bytes 530912 jump DOCKER # handle 3
tcp dport 80 counter packets 0 bytes 0 redirect to :9080 # handle 14
tcp dport 443 counter packets 10 bytes 800 redirect to :9443 # handle 15
}
.....
.....
```
ルールを削除
```auto
$ sudo nft delete rule ip6 nat PREROUTING handle 14
```
* * *
### systemdで起動時にルール適用
#### **① スクリプトを作成**
まず、`iptables_redirect.sh` を作成し、実行権限を付与
```shell
$ sudo nano /usr/local/bin/iptables_redirect.sh
```
```shell
#!/bin/bash
# IPv4 ルール
iptables -t nat -A PREROUTING -p tcp --dport 80 -j REDIRECT --to-port 8080
iptables -t nat -A PREROUTING -p tcp --dport 443 -j REDIRECT --to-port 8443
# IPv6 ルール
ip6tables -t nat -A PREROUTING -p tcp --dport 80 -j REDIRECT --to-port 8080
ip6tables -t nat -A PREROUTING -p tcp --dport 443 -j REDIRECT --to-port 8443
```
保存して、実行権限を付与:
```shell
$ sudo chmod +x /usr/local/bin/iptables_redirect.sh
```
#### **② systemd サービスを作成**
```shell
$ sudo nano /etc/systemd/system/iptables_redirect.service
```
```ini
[Unit]
Description=Set iptables NAT rules for local redirection
After=network.target
[Service]
Type=oneshot
ExecStart=/usr/local/bin/iptables_redirect.sh
RemainAfterExit=yes
[Install]
WantedBy=multi-user.target
```
保存したら、以下のコマンドで有効化:
```shell
$ sudo systemctl enable iptables_redirect
$ sudo systemctl start iptables_redirect
```
* * *
#### 2 : redirでポートリダイレクト
```auto
$ sudo apt install redir
$ sudo redir :80 127.0.0.1:8080
```
システムデーモンへ登録
/etc/systemd/system/redir.service
```auto
[Unit]
Description=Redirect tcp port 80 to 8080 with redir
[Service]
ExecStart=/bin/redir -sn :80 127.0.0.1:8080
[Install]
WantedBy=multi-user.target
```
起動
```auto
$ sudo systemctl enable --now redir.service
```
* * *
#### 3 : CAP\_NET\_BIND\_SERVICE
[capabilities(7) - Linux manual page](https://man7.org/linux/man-pages/man7/capabilities.7.html)
> CAP\_NET\_BIND\_SERVICE
> Bind a socket to Internet domain privileged ports (port
> numbers less than 1024).
```auto
$ sudo setcap cap_net_bind_service=ep /usr/bin/rootlesskit
```
`setcap` コマンドの `cap_net_bind_service=ep` における `ep` は、 **Effective (有効) と Permitted (許可)** の2つのケーパビリティセットを指定するフラグです。
### `ep` の意味:
- `e` (Effective) : 実行時にこのケーパビリティを有効にする
- `p` (Permitted) : プロセスがこのケーパビリティを保持することを許可する
つまり、 `/usr/bin/rootlesskit` に `cap_net_bind_service=ep` を設定すると、このバイナリを実行するプロセスは **1024未満のポート** (例: 80, 443) を **root権限なし** でバインドできるようになります。
解除
```auto
$ sudo setcap -r /usr/bin/rootlesskit
```
#### 4 : 非特権ポートへ移行
ポート80以上が非特権ポートになります。
```auto
$ echo 80 | sudo tee /proc/sys/net/ipv4/ip_unprivileged_port_start
```
システムのデフォルトとして登録
```auto
$ echo net.ipv4.ip_unprivileged_port_start = 80 | sudo tee /etc/sysctl.d/90-unprivileged_port_start.conf
```
* * *
コンテナ起動時のネットワークオプション
[podman-run — Podman documentation](https://docs.podman.io/en/latest/markdown/podman-run.1.html#network-mode-net)
> ## **–network** =_mode_, **–net**
>
> Set the network mode for the container.
>
> Valid _mode_ values are:
>
> - **bridge[:OPTIONS,…]**: Create a network stack on the default bridge. This is the default for rootful containers. It is possible to specify these additional options:
> - **alias=** _name_: Add network-scoped alias for the container.
> - **ip=** _IPv4_: Specify a static IPv4 address for this container.
> - **ip6=** _IPv6_: Specify a static IPv6 address for this container.
> - **mac=** _MAC_: Specify a static MAC address for this container.
> - **interface\_name=** _name_: Specify a name for the created network interface inside the container.
> - **host\_interface\_name=** _name_: Specify a name for the created network interface outside the container.Any other options will be passed through to netavark without validation. This can be useful to pass arguments to netavark plugins.For example, to set a static ipv4 address and a static mac address, use `--network bridge:ip=10.88.0.10,mac=44:33:22:11:00:99`.
>
> - **[:OPTIONS,…]**: Connect to a user-defined network; this is the network name or ID from a network created by **[podman network create](https://docs.podman.io/en/latest/markdown/podman-network-create.1.html)**. It is possible to specify the same options described under the bridge mode above. Use the **–network** option multiple times to specify additional networks.
> For backwards compatibility it is also possible to specify comma-separated networks on the first **–network** argument, however this prevents you from using the options described under the bridge section above.
> - **none** : Create a network namespace for the container but do not configure network interfaces for it, thus the container has no network connectivity.
> - **container:** _id_: Reuse another container’s network stack.
> - **host** : Do not create a network namespace, the container uses the host’s network. Note: The host mode gives the container full access to local system services such as D-bus and is therefore considered insecure.
> - **ns:** _path_: Path to a network namespace to join.
> - **private** : Create a new namespace for the container. This uses the **bridge** mode for rootful containers and **slirp4netns** for rootless ones.
> - **slirp4netns[:OPTIONS,…]**: use **slirp4netns** (1) to create a user network stack. It is possible to specify these additional options, they can also be set with `network_cmd_options` in containers.conf:
> - **allow\_host\_loopback=true|false** : Allow slirp4netns to reach the host loopback IP (default is 10.0.2.2 or the second IP from slirp4netns cidr subnet when changed, see the cidr option below). The default is false.
> - **mtu=** _MTU_: Specify the MTU to use for this network. (Default is `65520`).
> - **cidr=** _CIDR_: Specify ip range to use for this network. (Default is `10.0.2.0/24`).
> - **enable\_ipv6=true|false** : Enable IPv6. Default is true. (Required for `outbound_addr6`).
> - **outbound\_addr=** _INTERFACE_: Specify the outbound interface slirp binds to (ipv4 traffic only).
> - **outbound\_addr=** _IPv4_: Specify the outbound ipv4 address slirp binds to.
> - **outbound\_addr6=** _INTERFACE_: Specify the outbound interface slirp binds to (ipv6 traffic only).
> - **outbound\_addr6=** _IPv6_: Specify the outbound ipv6 address slirp binds to.
> - **port\_handler=rootlesskit** : Use rootlesskit for port forwarding. Default.
> Note: Rootlesskit changes the source IP address of incoming packets to an IP address in the container network namespace, usually `10.0.2.100`. If the application requires the real source IP address, e.g. web server logs, use the slirp4netns port handler. The rootlesskit port handler is also used for rootless containers when connected to user-defined networks.
> - **port\_handler=slirp4netns** : Use the slirp4netns port forwarding, it is slower than rootlesskit but preserves the correct source IP address. This port handler cannot be used for user-defined networks.
>
> - **pasta[:OPTIONS,…]**: use **pasta** (1) to create a user-mode networking stack.
> This is the default for rootless containers and only supported in rootless mode.
> By default, IPv4 and IPv6 addresses and routes, as well as the pod interface name, are copied from the host. If port forwarding isn’t configured, ports are forwarded dynamically as services are bound on either side (init namespace or container namespace). Port forwarding preserves the original source IP address. Options described in pasta(1) can be specified as comma-separated arguments.
> In terms of pasta(1) options, **–config-net** is given by default, in order to configure networking when the container is started, and **–no-map-gw** is also assumed by default, to avoid direct access from container to host using the gateway address. The latter can be overridden by passing **–map-gw** in the pasta-specific options (despite not being an actual pasta(1) option).
> Also, **-t none** and **-u none** are passed if, respectively, no TCP or UDP port forwarding from host to container is configured, to disable automatic port forwarding based on bound ports. Similarly, **-T none** and **-U none** are given to disable the same functionality from container to host.
> Some examples:
> - **pasta:–map-gw** : Allow the container to directly reach the host using the gateway address.
> - **pasta:–mtu,1500** : Specify a 1500 bytes MTU for the _tap_ interface in the container.
> - **pasta:–ipv4-only,-a,10.0.2.0,-n,24,-g,10.0.2.2,–dns-forward,10.0.2.3,-m,1500,–no-ndp,–no-dhcpv6,–no-dhcp** , equivalent to default slirp4netns(1) options: disable IPv6, assign `10.0.2.0/24` to the `tap0` interface in the container, with gateway `10.0.2.3`, enable DNS forwarder reachable at `10.0.2.3`, set MTU to 1500 bytes, disable NDP, DHCPv6 and DHCP support.
> - **pasta:-I,tap0,–ipv4-only,-a,10.0.2.0,-n,24,-g,10.0.2.2,–dns-forward,10.0.2.3,–no-ndp,–no-dhcpv6,–no-dhcp** , equivalent to default slirp4netns(1) options with Podman overrides: same as above, but leave the MTU to 65520 bytes
> - **pasta:-t,auto,-u,auto,-T,auto,-U,auto** : enable automatic port forwarding based on observed bound ports from both host and container sides
> - **pasta:-T,5201** : enable forwarding of TCP port 5201 from container to host, using the loopback interface instead of the tap interface for improved performance
>
> Invalid if using **–dns** , **–dns-option** , or **–dns-search** with **–network** set to **none** or **container:** _id_.
>
> If used together with **–pod** , the container joins the pod’s network namespace.
---
### Author:  [@tk-fuse](https://forum.ficusonline.com/u/tk-fuse)
#### Post date: [2025 年 3 月 20 日午後 2:34 UTC](https://forum.ficusonline.com/t/topic/525/5 "2025-03-20T14:34:55Z")
> **[Moving from docker-compose to Podman pods](https://www.redhat.com/en/blog/compose-podman-pods)**
>
> It feels like forever since I wrote my Red Hat Enterprise Linux 8 Beta intro to Podman. In fact, it's been quite a while, and a lot has happened sin...
> **[Podman: Managing pods and containers in a local container runtime | Red Hat...](https://developers.redhat.com/blog/2019/01/15/podman-managing-containers-pods?intcmp=701f20000012ngPAAQ#add_a_container_to_a_pod)**
>
> The pod concept for containers was introduced in Kubernetes. Podman lets you manage pods locally, giving it an advantage over other container runtimes

* * *
## Podman Quadlets with Podman Desktop
#### podman-systemd.unit - systemd units using Podman Quadlet
> **[podman-systemd.unit — Podman documentation](https://docs.podman.io/en/latest/markdown/podman-systemd.unit.5.html)**
> **[Make systemd better for Podman with Quadlet](https://www.redhat.com/en/blog/quadlet-podman)**
>
> One of the best features of Podman is how well it works with systemd. Podman uses the standard fork/exec model, which is easily adaptable to the systemd syst...
> **[Podman Quadlets with Podman Desktop | Podman Desktop](https://podman-desktop.io/blog/podman-quadlet)**
>
> Learn how to create & manage and use Quadlets with Podman Desktop

### Quadletの使用例
> [@ビデオ会議システム Jitsi Meet on Docker (+ Podman Pods)](https://forum.ficusonline.com/t/topic/381/6):
>
> システムデーモンで管理(自動起動) Podをシステムデーモンのサービスとして登録することで、ユーザログイン時、またはホストマシン起動時に自動起動することができます。 システムデーモンを利用する方法として以下の2つが提供されています。 1) $ podman generate systemd ~ 既存のポッド、コンテナからsystemdユニットファイルを生成しますが、あくまで既存のポッドやコンテ…
---
### Author:  [@tk-fuse](https://forum.ficusonline.com/u/tk-fuse)
#### Post date: [2025 年 4 月 25 日午前 7:32 UTC](https://forum.ficusonline.com/t/topic/525/6 "2025-04-25T07:32:05Z")
## REST API
#### Ver.4.9 リファレンス
> **[Reference](https://docs.podman.io/en/latest/_static/api.html?version=v4.9)**
ルートレスモード(ユーザレベル)で以下を実行(ルートモードの場合–user を省略してsudoで実行)。
```shell
$ systemctl --user status podman.socket
```
ソケットの有効化
```shell
$ systemctl --user enable --now podman.socket
```
Podman の REST API ソケットパスは以下のようになります:
- rootless(ユーザー): `/run/user/1000/podman/podman.sock`
- root権限: `/run/podman/podman.sock`
* * *
### curlによる実行例(ルートレスモード)
`podman info`
```shell
$ curl --unix-socket /run/user/1000/podman/podman.sock http://d/v4.0.0/libpod/info
```
`podman pull quay.io/containers/podman`
```shell
$ curl -XPOST --unix-socket /run/user/1000/podman/podman.sock -v '[http://d/v4.0.0/images/create?fromImage=quay.io%2Fcontainers%2Fpodman'](http://d/v4.0.0/images/create?fromImage=quay.io%2Fcontainers%2Fpodman%27)
```
`podman list images`
```shell
$ curl --unix-socket /run/user/1000/podman/podman.sock -v 'http://d/v4.0.0/libpod/images/json' | jq
```
---
### Author:  [@tk-fuse](https://forum.ficusonline.com/u/tk-fuse)
#### Post date: [2025 年 5 月 19 日午前 2:05 UTC](https://forum.ficusonline.com/t/topic/525/7 "2025-05-19T02:05:10Z")
## リモート操作
### Podmanリモートクライアント
[podman/docs/tutorials/remote\_client.md at main · containers/podman · GitHub](https://github.com/containers/podman/blob/main/docs/tutorials/remote_client.md)
* * *
**サーバ側** :ユーザレベルでpodman.socketを有効化しサービスを起動。
```shell
$ systemctl --user enable --now podman.socket
$ systemctl --user start podman.socket
$ systemctl --user status podman.socket
● podman.socket - Podman API Socket
Loaded: loaded (/usr/lib/systemd/user/podman.socket; enabled; preset: enabled)
Active: active (running) since Mon 2025-05-19 00:16:28 UTC; 2h 44min ago
Triggers: ● podman.service
Docs: man:podman-system-service(1)
Listen: /run/user/1000/podman/podman.sock (Stream)
CGroup: /user.slice/user-1000.slice/user@1000.service/app.slice/podman.socket
```
ログインしていない時にもソケットを機能させるためリンガーを有効にします。
```shell
$ sudo loginctl enable-linger $USER
```
* * *
**クライアント側** :SSH用のキーペアをssh-keygenコマンドでローカルに生成し、パブリックキーを接続先サーバ192.168.xx.xxの`~/.ssh/authorized_keys`に登録します。
```shell
$ ssh-keygen -t ed25519 -f ~/.ssh/id_ed25519
$ ssh-copy-id -i ~/.ssh/id_ed25519.pub user@192.168.xx.xx
```
リモートサーバの登録
```shell
$ podman --remote system connection add USER --identity ~/.ssh/id_ed25519 ssh://USER@192.168.xx.xx/run/user/1000/podman/podman.sock
```
リモート先の確認
```shell
$ podman --remote system connection list
Name URI Identity Default
USER ssh://USER@192.168.xx.xx:22/run/user/1000/podman/podman.sock /home/USER/.ssh/id_ed25519 true
```
あとはクライアントから通常の`podman`コマンドに`--remote`オプションを挟んでリモート先のpodmanを操作
```shell
$ podman --remote info
```
* * *
### Podman Desktopリモートアクセス
上記設定が済んだら、クライアント側のPodman-Desktopにリモート先の内容が反映されるようにします。
> **[Remote access | Podman Desktop](https://podman-desktop.io/docs/podman/podman-remote)**
>
> Podman Desktop can access remote instances of Podman.
下記設定メニューから、podmanの拡張機能のリモートの箇所を有効にして下さい。
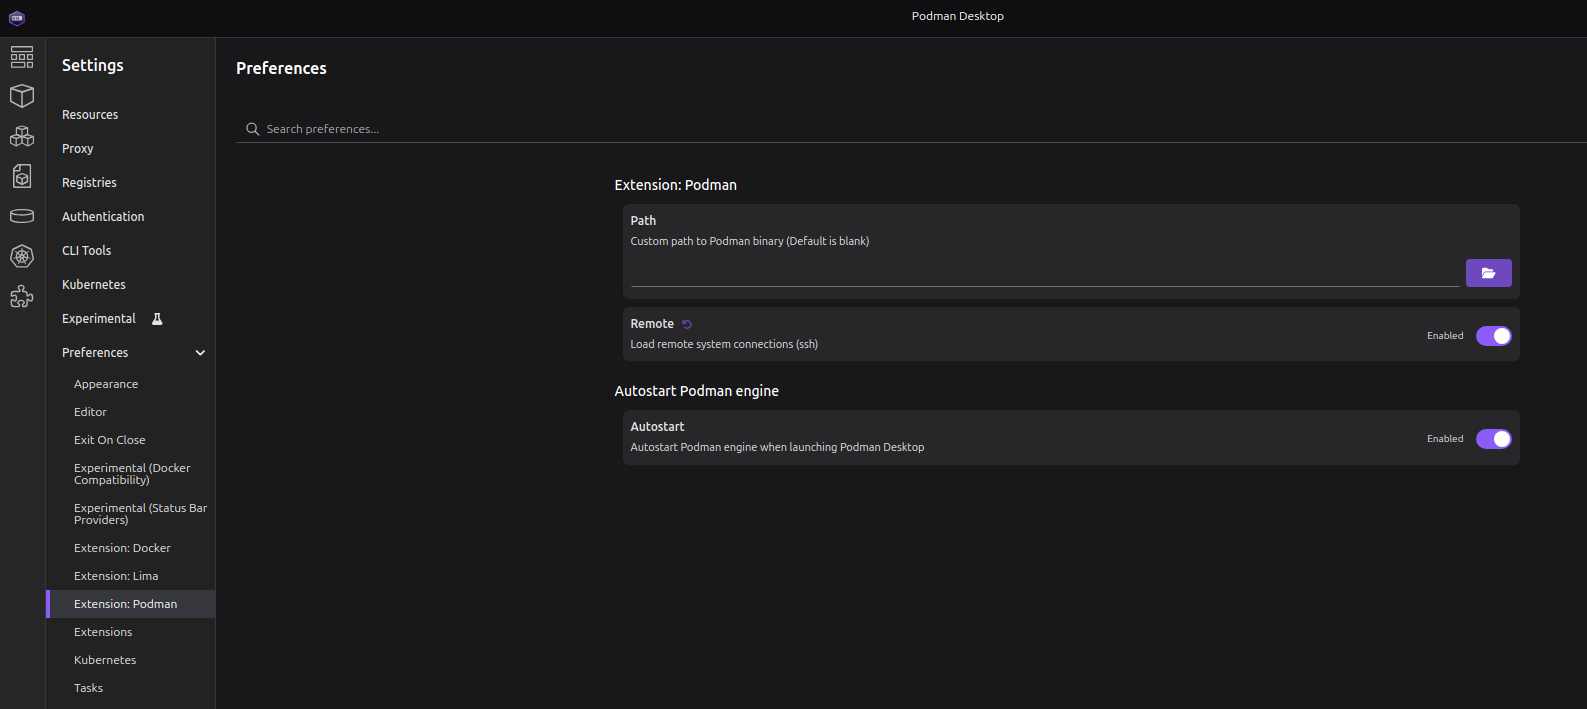
これでリモートのPod、コンテナ操作が行えます。
---
### Author:  [@tk-fuse](https://forum.ficusonline.com/u/tk-fuse)
#### Post date: [2025 年 5 月 26 日午前 5:17 UTC](https://forum.ficusonline.com/t/topic/525/8 "2025-05-26T05:17:37Z")
## podman:minikube
> **[podman](https://minikube.sigs.k8s.io/docs/drivers/podman/)**
>
> Overview The podman driver is an alternative container runtime to the Docker driver.
> Requirements Install podman
> Experimental This is an experimental driver. Please use it only for experimental reasons until it has reached maturity. For a more...
minikubeでpodmanをルートレスモードで使用するには、
```shell
$ minikube config set rootless true
```
```shell
$ minikube start --driver=podman --container-runtime=containerd
😄 minikube v1.36.0 on Ubuntu 24.04
▪ MINIKUBE_ROOTLESS=true
✨ Using the podman driver based on user configuration
📌 Using rootless Podman driver
👍 Starting "minikube" primary control-plane node in "minikube" cluster
🚜 Pulling base image v0.0.47 ...
💾 Downloading Kubernetes v1.33.1 preload ...
> preloaded-images-k8s-v18-v1...: 393.66 MiB / 393.66 MiB 100.00% 2.09 Mi
> gcr.io/k8s-minikube/kicbase...: 502.26 MiB / 502.26 MiB 100.00% 2.24 Mi
E0526 05:17:44.015605 4271 cache.go:225] Error downloading kic artifacts: not yet implemented, see issue #8426
🔥 Creating podman container (CPUs=2, Memory=2200MB) ...|
📦 Preparing Kubernetes v1.33.1 on containerd 1.7.27 ...
▪ Generating certificates and keys ...
▪ Booting up control plane ...
▪ Configuring RBAC rules ...
🔗 Configuring CNI (Container Networking Interface) ...
🔎 Verifying Kubernetes components...
▪ Using image gcr.io/k8s-minikube/storage-provisioner:v5
🌟 Enabled addons: storage-provisioner, default-storageclass
💡 kubectl not found. If you need it, try: 'minikube kubectl -- get pods -A'
🏄 Done! kubectl is now configured to use "minikube" cluster and "default" namespace by default
```
```shell
$ minikube kubectl -- get nodes
> kubectl.sha256: 64 B / 64 B [-------------------------] 100.00% ? p/s 0s
> kubectl: 57.34 MiB / 57.34 MiB [--------------] 100.00% 3.92 MiB p/s 15s
NAME STATUS ROLES AGE VERSION
minikube Ready control-plane 5m12s v1.33.1
```
```shell
$ minikube kubectl -- get pods -A
NAMESPACE NAME READY STATUS RESTARTS AGE
kube-system coredns-674b8bbfcf-wfjws 1/1 Running 0 5m25s
kube-system etcd-minikube 1/1 Running 0 5m31s
kube-system kindnet-rdl2m 1/1 Running 0 5m25s
kube-system kube-apiserver-minikube 1/1 Running 0 5m31s
kube-system kube-controller-manager-minikube 1/1 Running 0 5m33s
kube-system kube-proxy-7j787 1/1 Running 0 5m25s
kube-system kube-scheduler-minikube 1/1 Running 0 5m31s
kube-system storage-provisioner 1/1 Running 1 (4m55s ago) 5m30s
```
注)minikubeのコマンドオプションとしてkubectlを実行する場合には "minikube kubectl – "、kubectlをインストールしている場合は “minikube” と “–” を除外。
ダッシュボードはminikubeのアドオンのため、dashboardアドオンを有効にするか、minikube dashboardコマンドを一度実行することでアドオンが有効になります。
```shell
$ minikube addons enable dashboard
💡 dashboard is an addon maintained by Kubernetes. For any concerns contact minikube on GitHub.
You can view the list of minikube maintainers at: https://github.com/kubernetes/minikube/blob/master/OWNERS
▪ Using image docker.io/kubernetesui/dashboard:v2.7.0
▪ Using image docker.io/kubernetesui/metrics-scraper:v1.0.8
💡 Some dashboard features require the metrics-server addon. To enable all features please run:
minikube addons enable metrics-server
🌟 The 'dashboard' addon is enabled
```
```shell
$ minikube dashboard
🔌 Enabling dashboard ...
▪ Using image docker.io/kubernetesui/metrics-scraper:v1.0.8
▪ Using image docker.io/kubernetesui/dashboard:v2.7.0
💡 Some dashboard features require the metrics-server addon. To enable all features please run:
minikube addons enable metrics-server
🤔 Verifying dashboard health ...
🚀 Launching proxy ...
🤔 Verifying proxy health ...
🎉 Opening http://127.0.0.1:36801/api/v1/namespaces/kubernetes-dashboard/services/http:kubernetes-dashboard:/proxy/ in your default browser...
👉 http://127.0.0.1:36801/api/v1/namespaces/kubernetes-dashboard/services/http:kubernetes-dashboard:/proxy/
^C
```
アドオンリスト
```shell
$ minikube addons list
|-----------------------------|----------|--------------|--------------------------------|
| ADDON NAME | PROFILE | STATUS | MAINTAINER |
|-----------------------------|----------|--------------|--------------------------------|
| ambassador | minikube | disabled | 3rd party (Ambassador) |
| amd-gpu-device-plugin | minikube | disabled | 3rd party (AMD) |
| auto-pause | minikube | disabled | minikube |
| cloud-spanner | minikube | disabled | Google |
| csi-hostpath-driver | minikube | disabled | Kubernetes |
| dashboard | minikube | enabled ✅ | Kubernetes |
| default-storageclass | minikube | enabled ✅ | Kubernetes |
| efk | minikube | disabled | 3rd party (Elastic) |
| freshpod | minikube | disabled | Google |
| gcp-auth | minikube | disabled | Google |
| gvisor | minikube | disabled | minikube |
| headlamp | minikube | disabled | 3rd party (kinvolk.io) |
| inaccel | minikube | disabled | 3rd party (InAccel |
| | | | [info@inaccel.com]) |
| ingress | minikube | disabled | Kubernetes |
| ingress-dns | minikube | disabled | minikube |
| inspektor-gadget | minikube | disabled | 3rd party |
| | | | (inspektor-gadget.io) |
| istio | minikube | disabled | 3rd party (Istio) |
| istio-provisioner | minikube | disabled | 3rd party (Istio) |
| kong | minikube | disabled | 3rd party (Kong HQ) |
| kubeflow | minikube | disabled | 3rd party |
| kubevirt | minikube | disabled | 3rd party (KubeVirt) |
| logviewer | minikube | disabled | 3rd party (unknown) |
| metallb | minikube | disabled | 3rd party (MetalLB) |
| metrics-server | minikube | disabled | Kubernetes |
| nvidia-device-plugin | minikube | disabled | 3rd party (NVIDIA) |
| nvidia-driver-installer | minikube | disabled | 3rd party (NVIDIA) |
| nvidia-gpu-device-plugin | minikube | disabled | 3rd party (NVIDIA) |
| olm | minikube | disabled | 3rd party (Operator Framework) |
| pod-security-policy | minikube | disabled | 3rd party (unknown) |
| portainer | minikube | disabled | 3rd party (Portainer.io) |
| registry | minikube | disabled | minikube |
| registry-aliases | minikube | disabled | 3rd party (unknown) |
| registry-creds | minikube | disabled | 3rd party (UPMC Enterprises) |
| storage-provisioner | minikube | enabled ✅ | minikube |
| storage-provisioner-gluster | minikube | disabled | 3rd party (Gluster) |
| storage-provisioner-rancher | minikube | disabled | 3rd party (Rancher) |
| volcano | minikube | disabled | third-party (volcano) |
| volumesnapshots | minikube | disabled | Kubernetes |
| yakd | minikube | disabled | 3rd party (marcnuri.com) |
|-----------------------------|----------|--------------|--------------------------------|
```
リモートからダッシュボードへproxy経由でアクセス
```shell
$ kubectl proxy --address=0.0.0.0 --accept-hosts='.*'
Starting to serve on [::]:8001
```
同一LAN内の他PCからアクセス
```auto
http://:8001/api/v1/namespaces/kubernetes-dashboard/services/http:kubernetes-dashboard:/proxy/
```
minikubeステータス確認
```shell
$ minikube status
minikube
type: Control Plane
host: Running
kubelet: Running
apiserver: Running
kubeconfig: Configured
```
**注)** minikubeをPodmanコンテナ上で動かしていて、そのコンテナを `podman stop` → `podman start` で再起動しただけでは、Kubernetes のコントロールプレーン(API server, scheduler, controller-manager など)は自動で復活しないようです。これは minikube が **コンテナの起動時に内部で必要な初期化処理** (特に systemd や起動スクリプトなど)を実行していないため。
この場合、`$ minikube start` を実行します。
* * *
minikube の kubeconfig が現在使われていることを確認
```shell
$ kubectl config current-context
minikube
```
minikube 以外のコンテキストが存在する場合、それに切り替えることも可能
```shell
$ kubectl config get-contexts
CURRENT NAME CLUSTER AUTHINFO NAMESPACE
* minikube minikube minikube default
$ kubectl config use-context <別のcontext名>
```