既に本ブログ記事やフォーラムで紹介したDockerコンテナで構築したFlexisipサーバによるSIP電話システムに、Belledonne Communicationsが公開しているFlexisipアカウントマネージャー(XMLRPCサーバ)を導入します。これによりAndroid版Linphoneアプリから直接ユーザ登録が出来るようになります。Linphone本家のSIPシステムとは完全に切り離された通話システムとなり、ユーザ管理をこのSIP電話システム保有者側でコントロールできるため、ホームインターホンとしての利用、学校などの教育機関に導入することにより、生徒・教師・保護者といった限られたユーザ間で安全に相互コミュニケーションを図ることができるようになります。

ユーザ管理用のバックエンドについては、最近APIが追加されたようなので、現在検証中です。
本ブログで紹介する内容により以下のことが出来るようになります。
- A. Linphoneアプリのリモート設定から任意のXMLRPCサーバ(アカウントマネージャー)を指定
- B. Linphoneアプリからユーザ名、パスワード、メールアドレス入力によるユーザ登録
- C. メールによるアカウント認証
A. について、XMLRPCサーバの変更は、プロビジョニングによりカスタム化したXMLファイルを読み込ませても反映されません。
デフォルトでは、Linphone側で設定されたXMLRPCサーバを読み込むようになっているため、Android版Linphoneを再ビルドする必要があります。
B. について、SMSを利用したユーザ登録から、メールアドレスベースのユーザ登録へ変更します。
C. について、デフォルトではSMS認証ですが、GmailのSMTPサーバを利用したメール認証に変更して、サーバ側に送信通信費がかからないようにします。
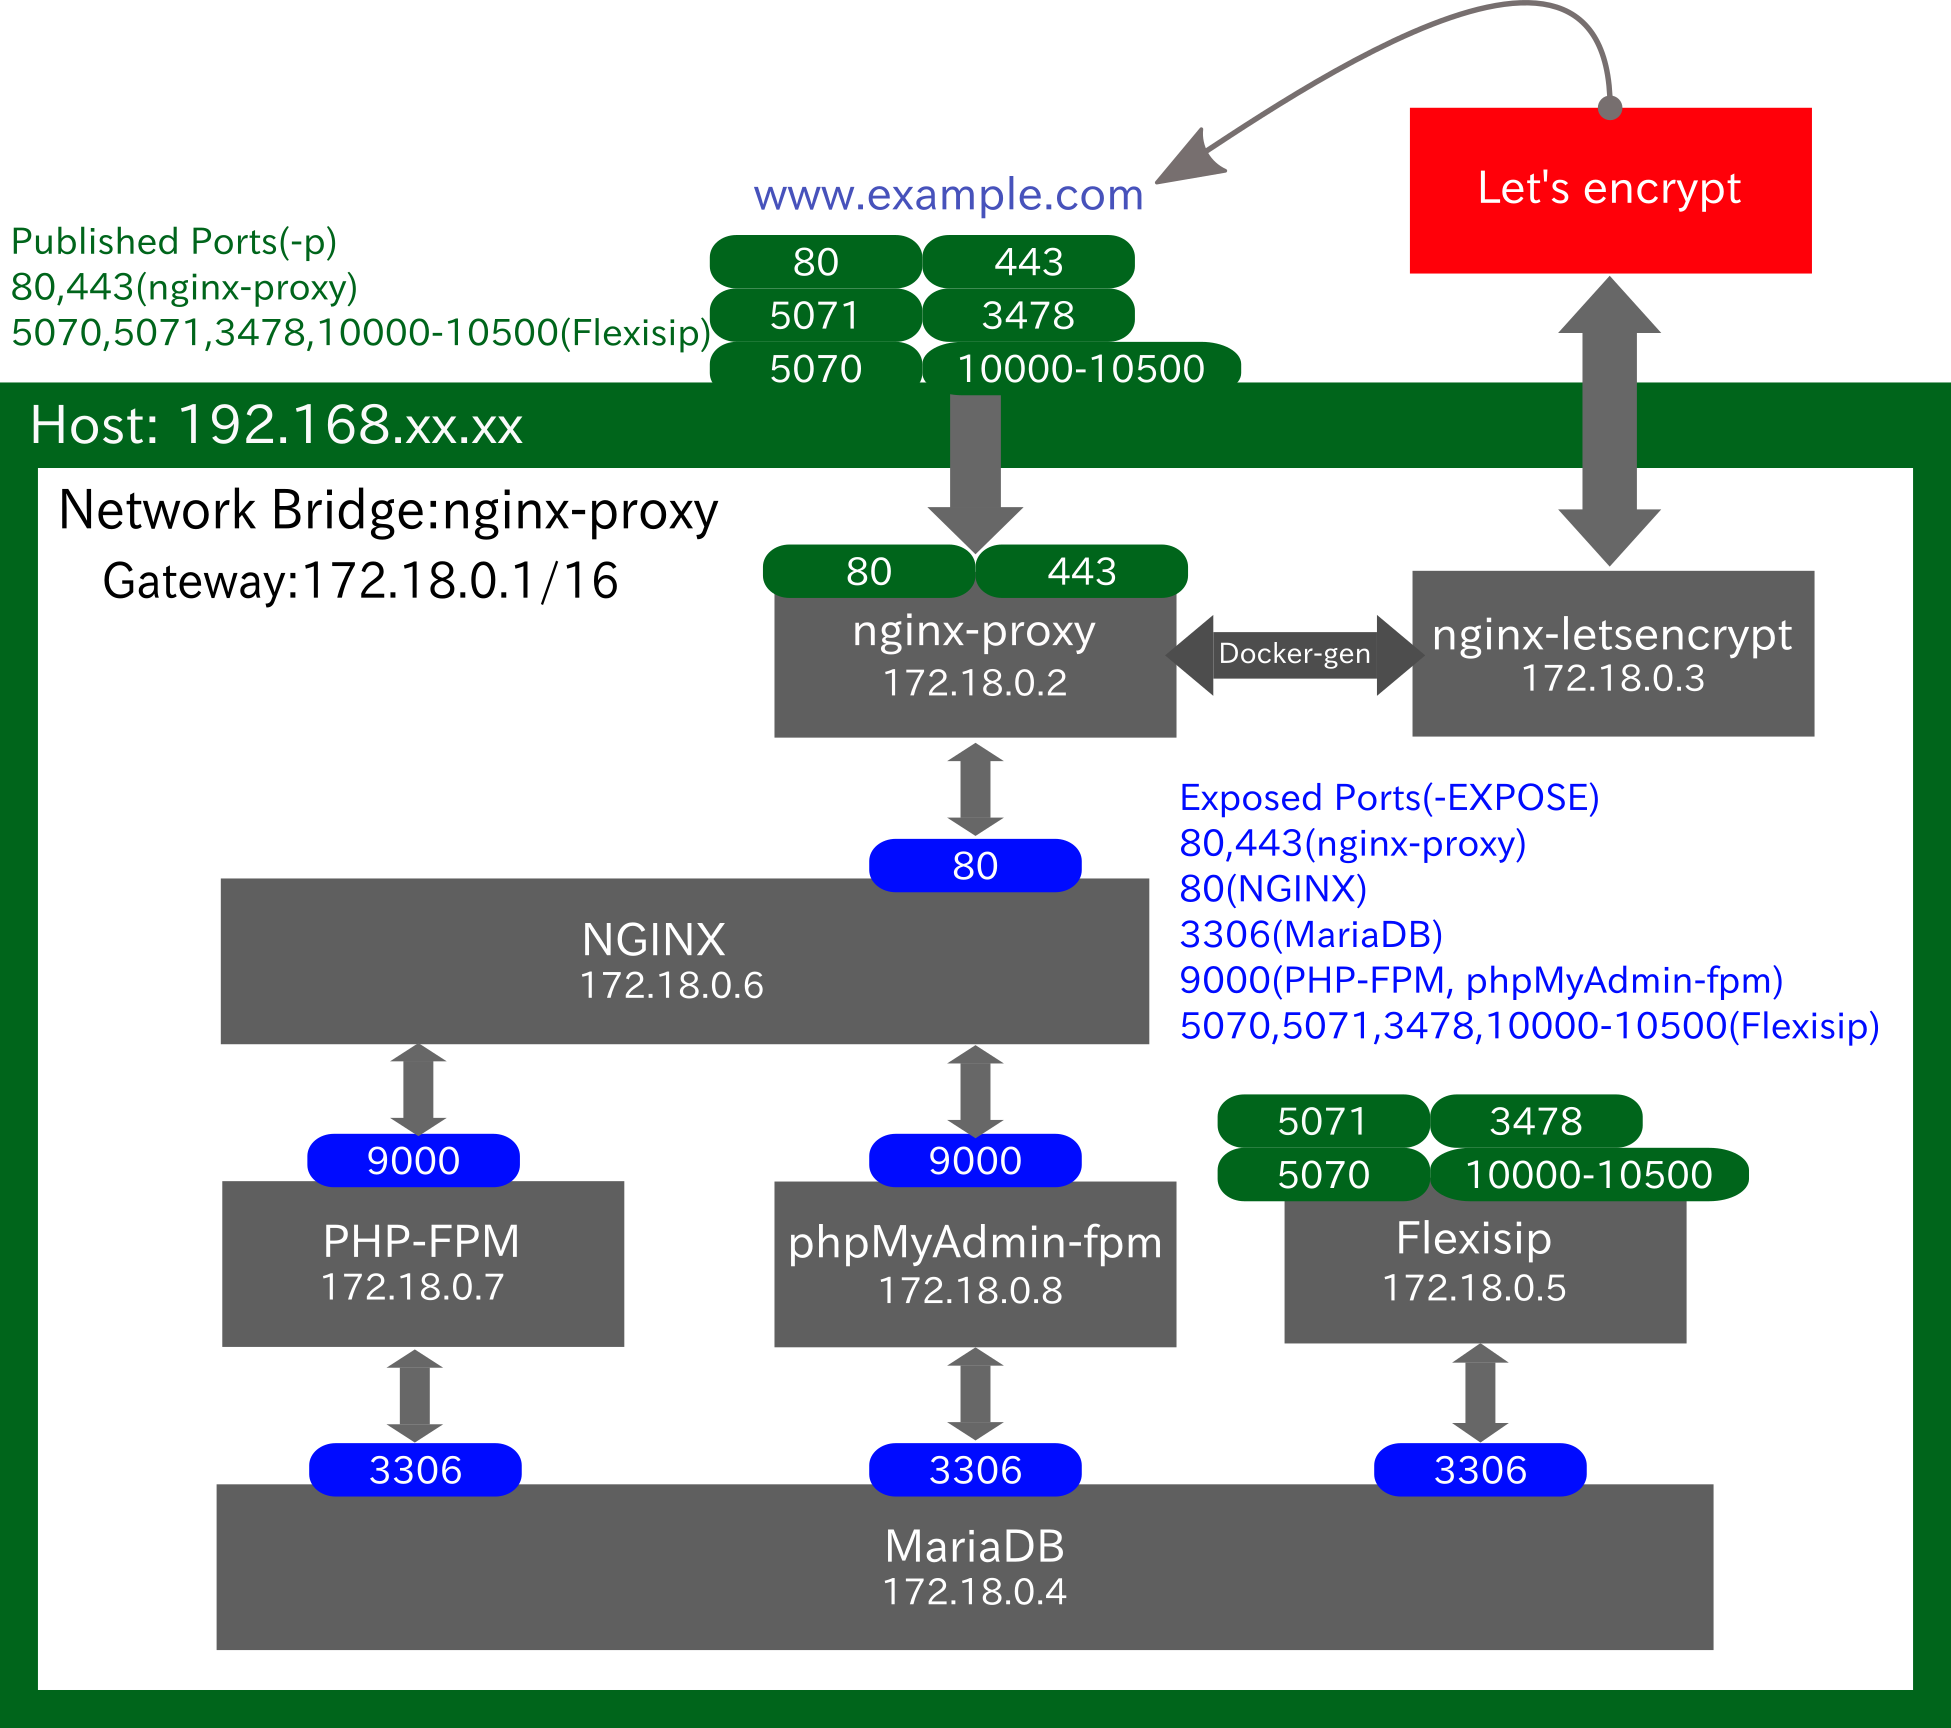
導入先システム
Flexisip-Account-Manager:
を以下Dockerコンテナによる既存システム内のPHP-FPMコンテナにインストールします。
導入プロセス
1. Dockerシステムへの導入
1-1. Docker-Composeファイルによるアカウントマネージャー導入
1-2. php-fpmコンテナの設定
1-3. Dockerコンテナnginxの設定
1-4. アカウントデータテーブルの作成
1-5. flexisip.conf sociの設定
2. Android StudioによるLinphoneアプリのカスタムビルド
2-1. Linphoneビルド設定ファイルの編集
2-2. Linphoneビルド
2-3. カスタムLinphoneのインストール
3. Flexisipアカウントマネージャー構成ファイルの編集・追加
3-1. リモート設定
3-2. PHPMailerの導入
3-3. email認証用PHPファイルの作成
4. 動作確認
4-1. リモート設定ファイルの読込
4-2. ユーザ登録・メール認証
1. Dockerシステムへの導入
既にフォーラム記事で紹介している内容です。
Flexisipサーバ構築時に作成したDocker-Composeファイル内で、flexisip-account-managerの各ファイルをphp-fpmとnginxで共有します。
1-1. Docker-Composeファイルによるアカウントマネージャー導入
Flexisip用docker-composeファイル 内で、 flexisip-account-manager 用に新たに共有ボリュームを nginx と php-fpm の項目に追加します。
注)docker-compose を再起動すると、上記コンテナの設定が全てリセットされるため、新たに追加パッケージをインストールする必要が有ります(必要なパッケージは#コメントで明示しています)。
# nginx, additional install $ docker exec nginx apk add bash nano
  nginx:
    container_name: nginx
    image: nginx:alpine
    tty: true
    environment:
      - VIRTUAL_HOST=test.site.com
      - VIRTUAL_ROOT=/var/www/html
      - VIRTUAL_PORT=80
      # - VIRTUAL_PROTO=fastcgi
      - LETSENCRYPT_HOST=test.site.com
      - [email protected]
    volumes:
      # shared nginx default.conf between host and container
      - ./nginx_default.conf:/etc/nginx/conf.d/default.conf
      # shared the directory /var/www/html in php-fpm container
      - ./html:/var/www/html/register
      # shared the directory /var/www/html in phpmysql-fpm container
      - ./phpmyadmin_data:/var/www/html/phpmyadmin
      # for flexisip-account-manager
      - ./flexisip-account-manager:/var/www/html/flexisip-account-manager
    external_links:
      - nginx-proxy-letsencrypt
    restart: always
    networks:
      proxy-tier:
        ipv4_address: 172.18.0.6

  # php-fpm, additional install $ docker exec php-fpm apk add bash nano
  # php extension mysqli should be installed, $ docker exec php-fpm docker-php-ext-install mysqli
  # for Userfrosting, install followings.
  # apk add libpng-dev freetype-dev libjpeg-turbo-dev zip
  # docker-php-ext-configure gd --with-freetype-dir=/usr/include/ --with-jpeg-dir=/usr/include/
  # docker-php-ext-install -j$(nproc) gd
  # docker-php-ext-install -j$(nproc) pdo pdo_mysql
  # docker-php-ext-install -j$(nproc) zip
  php-fpm:
    container_name: php-fpm
    image: php:7.2-fpm-alpine
    tty: true
    expose:
      - "9000"
    volumes:
      - ./html:/var/www/html/register
      # for flexisip-account-manager. install # apk add libxml2-dev, # docker-php-ext-install xmlrpc
      - ./flexisip-account-manager:/var/www/html/flexisip-account-manager
      - ./etc/flexisip-account-manager:/etc/flexisip-account-manager
    depends_on:
      - flexisip-mariadb
    restart: always
    networks:
      proxy-tier:
        ipv4_address: 172.18.0.7

![]()
任意のディレクトリ内でgit cloneコマンドによりflexisip-account-managerをダウンロードします。
$ git clone https://gitlab.linphone.org/BC/public/flexisip-account-manager.git
srcフォルダ と confフォルダ の中身を docker-compose ファイルで設定した共有フォルダ flexisip-account-manager と etc/flexisip-account-manager へコピーします。

1-2. php-fpmコンテナの設定
php-fpmコンテナ内にbashコマンドで移動し、XMLRPCサーバに必要なパッケージ、機能拡張をインストールします。インストール後、再起動します。
$ docker exec -ti php-fpm bash

# apk add libxml2-dev
# docker-php-ext-install xmlrpc
# exit
php-fpmの再起動
$ docker container restart php-fpm
1-3. Dockerコンテナnginxの設定
nginxコンテナ内でサブディレクトリ flexisip-account-manager の追加・設定をします。
$ docker exec -ti nginx bash
# nano /etc/nginx/conf.d/default.conf
location ^~ /flexisip-account-manager {

    alias /var/www/html/flexisip-account-manager/xmlrpc;
    try_files $uri $uri/ @flexisip-account-manager;

    location ~ \.php$ {
        fastcgi_split_path_info ^\/flexisip-account-manager\/(.+\.php)(.*)$;
        fastcgi_param  HTTPS 'on';
        fastcgi_pass   php-fpm:9000;
        include        fastcgi_params;
        fastcgi_param  SCRIPT_FILENAME $request_filename;
    }
  }

  location @flexisip-account-manager {
     rewrite /flexisip-account-manager/(.*)$ /flexisip-account-manager/xmlrpc.php;
  }
設定のリロード
# nginx -s reload
1-4. アカウントデータテーブルの作成
事前に
/etc/flexisip-account-manager/db.conf
/var/www/html/flexisip-account-manager/database/database.php
内でデータベース、ユーザ名、パスワードを設定して下さい。
db.conf
define("DB_HOST", "mariadb-flexisip");

define("DB_USER", "flexisip");

define("DB_PASSWORD", "your_password");

define("DB_NAME", "flexisip");
database.php
"mysql:host=flexisip-mariadb;dbname=flexisip"
php-fpmコンテナ内で以下phpスクリプトを実行してアカウント用テーブルを作成します。
$ docker exec -ti php-fpm bash
# php /var/www/html/flexisip-account-manager/tools/create_tables.php
(参考)各テーブルの作成クエリは以下の通りです。
accounts	CREATE TABLE `accounts` (
 `id` int(11) unsigned NOT NULL AUTO_INCREMENT,
 `username` varchar(64) COLLATE utf8mb4_unicode_ci NOT NULL,
 `domain` varchar(64) COLLATE utf8mb4_unicode_ci NOT NULL,
 `email` varchar(64) COLLATE utf8mb4_unicode_ci DEFAULT NULL,
 `activated` varchar(1) COLLATE utf8mb4_unicode_ci NOT NULL DEFAULT '0',
 `confirmation_key` varchar(14) COLLATE utf8mb4_unicode_ci DEFAULT NULL,
 `ip_address` varchar(39) COLLATE utf8mb4_unicode_ci NOT NULL,
 `user_agent` varchar(256) COLLATE utf8mb4_unicode_ci NOT NULL,
 `creation_time` datetime NOT NULL,
 `expire_time` datetime DEFAULT NULL,
 PRIMARY KEY (`id`),
 UNIQUE KEY `identity` (`username`,`domain`)
) ENGINE=InnoDB AUTO_INCREMENT=10 DEFAULT CHARSET=utf8mb4 COLLATE=utf8mb4_unicode_ci

aliases	CREATE TABLE `aliases` (
 `id` int(11) unsigned NOT NULL AUTO_INCREMENT,
 `account_id` int(11) unsigned NOT NULL,
 `alias` varchar(64) COLLATE utf8mb4_unicode_ci NOT NULL,
 `domain` varchar(64) COLLATE utf8mb4_unicode_ci NOT NULL,
 PRIMARY KEY (`id`),
 UNIQUE KEY `identity` (`alias`,`domain`)
) ENGINE=InnoDB DEFAULT CHARSET=utf8mb4 COLLATE=utf8mb4_unicode_ci

devices	CREATE TABLE `devices` (
 `id` int(11) unsigned NOT NULL AUTO_INCREMENT,
 `manufacturer` varchar(64) COLLATE utf8mb4_unicode_ci NOT NULL,
 `model` varchar(34) COLLATE utf8mb4_unicode_ci NOT NULL,
 `status` varchar(34) COLLATE utf8mb4_unicode_ci NOT NULL,
 `delay` int(4) NOT NULL DEFAULT 0,
 `hardware_echo_canceller` tinyint(1) NOT NULL DEFAULT 0,
 PRIMARY KEY (`id`)
) ENGINE=InnoDB DEFAULT CHARSET=utf8mb4 COLLATE=utf8mb4_unicode_ci

passwords	CREATE TABLE `passwords` (
 `id` int(11) unsigned NOT NULL AUTO_INCREMENT,
 `account_id` int(11) unsigned NOT NULL,
 `password` varchar(255) COLLATE utf8mb4_unicode_ci NOT NULL,
 `algorithm` varchar(10) COLLATE utf8mb4_unicode_ci NOT NULL DEFAULT 'MD5',
 PRIMARY KEY (`id`),
 UNIQUE KEY `account` (`account_id`,`algorithm`)
) ENGINE=InnoDB AUTO_INCREMENT=10 DEFAULT CHARSET=utf8mb4 COLLATE=utf8mb4_unicode_ci

sms	CREATE TABLE `sms` (
 `id` int(11) unsigned NOT NULL AUTO_INCREMENT,
 `phone` varchar(64) COLLATE utf8mb4_unicode_ci DEFAULT NULL,
 `last_sms` bigint(15) unsigned DEFAULT 0,
 `count` tinyint(1) NOT NULL DEFAULT 0,
 PRIMARY KEY (`id`),
 UNIQUE KEY `phone` (`phone`)
) ENGINE=InnoDB DEFAULT CHARSET=utf8mb4 COLLATE=utf8mb4_unicode_ci

user_info	CREATE TABLE `user_info` (
 `id` int(11) unsigned NOT NULL AUTO_INCREMENT,
 `account_id` int(11) unsigned NOT NULL,
 `firstname` varchar(128) COLLATE utf8mb4_unicode_ci NOT NULL,
 `lastname` varchar(128) COLLATE utf8mb4_unicode_ci NOT NULL,
 `gender` enum('male','female') COLLATE utf8mb4_unicode_ci NOT NULL,
 `country_code` varchar(32) COLLATE utf8mb4_unicode_ci DEFAULT NULL,
 `country_name` varchar(512) COLLATE utf8mb4_unicode_ci DEFAULT NULL,
 `subscribe` enum('0','1') COLLATE utf8mb4_unicode_ci NOT NULL DEFAULT '0',
 PRIMARY KEY (`id`)
) ENGINE=InnoDB DEFAULT CHARSET=utf8mb4 COLLATE=utf8mb4_unicode_ci
1-5. flexisip.conf sociの設定
flexisip-account-managerにより作成されたaccountsテーブルとpasswordsテーブルは切り離されているので、accountsテーブルのusernameからpasswordを抽出できるよう Flexisip の設定ファイル flexisip.conf の soci の項目を変更します。
/etc/flexisip/flexisip.conf
soci-password-request=select passwords.password, 'SHA-256' from accounts inner join passwords on accounts.id=passwords.account_id where username = :id and domain = :domain
2. Android StudioによるLinphoneアプリのカスタムビルド
XMLRPCサーバの指定、メール認証を有効化するため、Android StudioによりLinphoneをカスタムビルドします。
2-1. Linphoneビルド設定ファイルの編集
Android版Linphoneをgit cloneコマンドでダウンロード後、Android Studioでプロジェクトを開きます。今回変更するファイルは、non_localizable_custom.xml, default_assistant_create.rc, linphone_assistant_create.rc, linphonerc_factoryの4ファイルです。一部ファイルの説明は下記に記載されています。
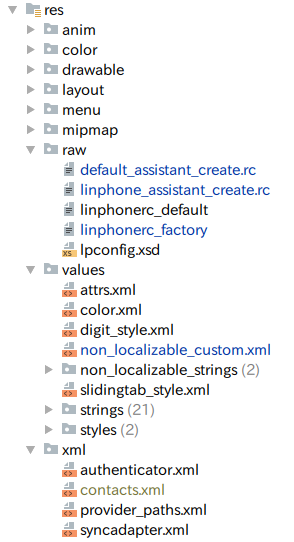
non_localizable_custom.xml
今回変更した箇所は以下の通りです(変更箇所のみ抜粋)。
デフォルトドメインの変更、SMS認証の無効化、メール認証の有効化と認証必須。
必要に応じて追加変更して下さい。
<?xml version="1.0" encoding="utf-8"?>
<resources>
............................
    <!-- URLs, URIs and domain -->
    <!-- Set the default domain used for account creation/addresses -->
    <string name="default_domain" translatable="false">sip.example.com</string>
    <string name="default_stun" translatable="false">sip.example.com:3478</string>
............................

    <!-- Phone numbers -->
    <bool name="use_phone_number_validation">false</bool><!-- Use phone number for validation -->

.............................
    <!-- Set the email field of the wizard with one of the gmail account registered on the device -->
    <bool name="pre_fill_email_in_assistant">true</bool>
    <bool name="assistant_account_validation_mandatory">true</bool>
........................

</resources>
default_assistant_create.rc
リモート設定からXMLRPCサーバの読込みが出来るように
<entry name="domain" overwrite="true"></entry> を削除します。
..............
  <section name="assistant">
    <entry name="algorithm" overwrite="true">MD5</entry>
    <entry name="password_max_length" overwrite="true">-1</entry>
    <entry name="password_min_length" overwrite="true">0</entry>
    <entry name="username_length" overwrite="true">-1</entry>
    <entry name="username_max_length" overwrite="true">128</entry>
    <entry name="username_min_length" overwrite="true">1</entry>
    <entry name="username_regex" overwrite="true">^[a-zA-Z0-9+_.\-]*$</entry>
  </section>
.....
linphone_assistant_create.rc
デフォルトで設定されるsipサーバとstunサーバを変更します。但しこの箇所については変更しなくてもLinphoneアプリ側でユーザ毎に設定できます。
リモート設定からXMLRPCサーバの読込みが出来るように <entry name="domain" overwrite="true">sip.linphone.org</entry> を削除します。
<section name="proxy_default_values">
...............................................
...............................................
<entry name="reg_identity" overwrite="true">sip:[email protected]:5071</entry>
<entry name="reg_proxy" overwrite="true"><sip:sip.example.com:5071;transport=tls></entry>
<entry name="reg_route" overwrite="true"><sip:sip.example.com:5071;transport=tls></entry>
..............................................
<entry name="realm" overwrite="true">sip.example.com</entry>
..............................................
</section>
<section name="nat_policy_default_values">
<entry name="stun_server" overwrite="true">sip.example.com:3478</entry>
...............................................
</section>
<section name="assistant">
<entry name="algorithm" overwrite="true">SHA-256</entry>
<entry name="password_max_length" overwrite="true">-1</entry>
<entry name="password_min_length" overwrite="true">1</entry>
<entry name="username_length" overwrite="true">-1</entry>
<entry name="username_max_length" overwrite="true">64</entry>
<entry name="username_min_length" overwrite="true">1</entry>
<entry name="username_regex" overwrite="true">^[a-z0-9+_.\-]*$</entry>
</section>
linphonerc_factory
XMLRPCサーバをリモート設定で指定できるようにするため以下の項目を削除します。
[assistant]
xmlrpc_url=https://subscribe.linphone.org:444/wizard.php
2-2. Linphoneビルド
Build—>APK(s)を実行してAPKファイルを作成します。

リビルトする場合は、Build—>Clear Project後、Build—>Build APK(s)を実行して下さい。
2-3. カスタムLinphoneのインストール
APKファイルをAndroid端末にダウンロード、APKファイルによるインストールを許可してインストールして下さい。
3. Flexisipアカウントマネージャー構成ファイルの編集・追加
リモート設定のプロビジョニングにXMLファイルを指定することで、Linphone設定のカスタマイズが出来ます。
本来は音声・ビデオ等のLinphoneの機能的な項目をより細かく設定をするためのものですが、登録ユーザを独自で用意したデータベースで管理するため、XMLRPCサーバの変更も出来るようにします。

3-1. リモート設定
リモート設定のプロビジョニングによる設定内容上書きを有効にします。
etc/provisioning.conf
<?php

/*
 * If set to True, each section will be flagged as overwrite, otherwise none of them will be flagged.
 *
 * Default value: False
 */
define("REMOTE_PROVISIONING_OVERWRITE_ALL", True);

/*
 * The path to a default linphone rc file to add to the generated remote provisioning
 * If using the default value, the default.rc file should be created in /opt/belledonne-communications/share/flexisip-account-manager/xmlrpc/ directory
 * If the file does not exists it is ignored
 *
 * The file should follow the lpconfig format, for example:
 * [sip]
 * rls_uri=sips:[email protected]
 * # This is a commentary, it won't appear in the generated xml provisioning
 *
 * Default value: "default.rc"
 */
define("REMOTE_PROVISIONING_DEFAULT_CONFIG", "default.rc");

/*
 * The default transport to set in the proxy config if not specified
 * Can be "tls", "tcp" or "udp"
 *
 * Default value: "tls"
 */
define("REMOTE_PROVISIONING_DEFAULT_TRANSPORT", "tls");

?>
xmlrpc/default.rc にXMLRPCサーバのドメインとアドレスを記述します。
#
#This file shall not contain path referencing package name, in order to be portable when app is renamed.
#Paths to resources must be set from LinphoneManager, after creating LinphoneCore.
[assistant]
domain=sip.example.com
xmlrpc_url=https://sip.example.com/flexisip-account-manager/xmlrpc.php
リモート設定のプロビジョニングにhttps://sip.example.cpm/flexisip-account-manager/provisioning.phpを指定することにより、xmlrpc/default.rcで設定した内容がXMLフォーマットで出力され、デフォルトの設定ファイルに上書きされます。
上手く設定が反映されない場合は、直接プロビジョニングにXMLファイルを指定することも出来ます。
プロビジョニングアドレス:https://sip.example.cpm/flexisip-account-manager/provisioning.xml
xmlrpc/provisionong.xml
<?xml version="1.0" encoding="UTF-8"?>
<config xmlns="http://www.linphone.org/xsds/lpconfig.xsd" xmlns:xsi="http://www.w3.org/2001/XMLSchema-instance" xsi:schemaLocation="http://www.linphone.org/xsds/lpconfig.xsd lpconfig.xsd">
	<section name="assistant">
		<entry name="domain" overwrite="true">sip.example.com</entry>
		<entry name="xmlrpc_url" overwrite="true">https://sip.example.com/flexisip-account-manager/xmlrpc.php</entry>
	</section>
</config>
3-2. PHPMailerの導入
メール認証にGmailのSMTPサーバを利用します。このためメール処理にPHPMailerを導入します。
https://github.com/PHPMailer/PHPMailer
まず初めにアカウントマネージャーで利用するメール機能の有効化と認証処理に利用する送信内容を確認・変更します。
etc/emails.conf
<?php
/* ### Email configuration ### */
/*
* Whever or not enable the send email feature.
* Used to send link to generate random password if user forgot it, or the newly generated email once the link has been clicked.
*
* Default value: False
*/
define("EMAIL_ENABLED", True);
/*
* The website address to display in the email header.
*
* Default value: https://linphone.org
*/
define("EMAIL_SITE", "https://sip.example.com");
/*
* The link to open when click on activation
* It can have a %key%, %username% and %algo% parameter
*
* Default value: www.linphone.org
*/
define("EMAIL_ACTIVATION_LINK", "sip.example.com/flexisip-account-manager/mail_activate.php?key=%key%&username=%username%&algo=%algo%");
/*
* The FROM address to set in the email header.
*
* Default value: [email protected]
*/
define("EMAIL_FROM_ADDR", "[email protected]");
/*
* The FROM display name to set in the email header.
*
* Default value: No reply at Linphone.org
*/
define("EMAIL_FROM_NAME", "No reply at Ficusonline");
/*
* The subject of the activation account email.
*/
define("EMAIL_ACTIVATION_SUBJECT", "Start your Ficusonline Linphone SIP service");
/*
* The body (as text) of the activation account email.
*/
define("EMAIL_ACTIVATION_BODY", "Hello,\nActivation pending for using your Ficusonline Linphone account.\nPlease use the link bellow to activate your account :\n\n%link%\n\nRegards,\nThe Linphone team.\n");
/*
* The body (as html) of the activation account email.
*/
define("EMAIL_ACTIVATION_BODY_HTML", '<html><head><title>Start your Ficusonline Linphone SIP service</title></head><body><p>Hello,</p><p>Activation pending for using your Linphone account.<br />Please use the link bellow to activate your account :</p><p><a href="%link%">%link%</a></p><p> </p><p>Regards,<br />The Linphone team.</p></body></html>');
/*
* The subject of the account recovery email.
*/
define("EMAIL_RECOVERY_SUBJECT", "Recover your Ficusonline Linphone SIP account");
/*
* The body (as text) of the account recovery email.
*/
define("EMAIL_RECOVERY_BODY", "Hello,\nHere is your recovery code: %key%\n\nRegards,\nThe Ficusonline Linphone team.\n");
/*
* The body (as html) of the account recovery email.
*/
define("EMAIL_RECOVERY_BODY_HTML", '<html><head><title>Recover your Ficusonline Linphone SIP account</title></head><body><p>Hello,</p><p>Here is your recovery code: %key%</p><p>Regards,<br />The Ficusonline Linphone team.</p></body></html>');
?>
PHPMailerをflexisip-account-managerフォルダにComposerによりインストールします。
サーバのルートフォルダ(FlexisipのXMLRPCサーバ)で以下コマンドを実行します。
$ sudo composer require phpmailer/phpmailer
以下ファイルのメール送信機能の箇所をPHPMailerに対応させます。
xmlrpc/email.php
<?php

/*
	Flexisip Account Manager is a set of tools to manage SIP accounts.
	Copyright (C) 2019 Belledonne Communications SARL, All rights reserved.

	This program is free software: you can redistribute it and/or modify
	it under the terms of the GNU Affero General Public License as
	published by the Free Software Foundation, either version 3 of the
	License, or (at your option) any later version.

	This program is distributed in the hope that it will be useful,
	but WITHOUT ANY WARRANTY; without even the implied warranty of
	MERCHANTABILITY or FITNESS FOR A PARTICULAR PURPOSE.  See the
	GNU Affero General Public License for more details.

	You should have received a copy of the GNU Affero General Public License
	along with this program.  If not, see <http://www.gnu.org/licenses/>.
*/
//Import PHPMailer classes into the global namespace
use PHPMailer\PHPMailer\PHPMailer;
use PHPMailer\PHPMailer\SMTP;

include_once __DIR__ . '/../config/config.php';
include_once __DIR__ . '/../misc/logging.php';

function send_email($email, $subject, $text, $html) {
	require '../vendor/autoload.php';

	$site = EMAIL_SITE;
	$from = EMAIL_FROM_ADDR;
	$name = EMAIL_FROM_NAME;
	$to = $email;
	// $from = $name." <".$from.">";

	$limite = "_----------=_parties_".md5(uniqid (rand()));

	// $headers  = "Reply-to: ".$from."\n";
	// $headers .= "From: ".$from."\n";
	// $headers .= "Return-Path: ".$from."\n";
	// $headers .= "X-Sender: <".$site.">\n";
	// $headers .= "X-Mailer: PHP\n";
	// $headers .= "X-auth-smtp-user: ".$from." \n";
	// $headers .= "X-abuse-contact: ".$from." \n";
	// $headers .= "Date: ".date("D, j M Y G:i:s O")."\n";
	// $headers .= "MIME-Version: 1.0\n";
	//$headers .= "Content-Type: multipart/alternative; boundary=\"".$limite."\"";

	$message = "";

	$message .= "--".$limite."\n";
	$message .= "Content-Type: text/plain; charset=\"utf-8\"\n";
	$message .= "Content-Transfer-Encoding: 8bit\n\n";
	$message .= $text;

	$message .= "\n\n--".$limite."\n";
	$message .= "Content-Type: text/html; charset=\"utf-8\"\n";
	$message .= "Content-Transfer-Encoding: 8bit;\n\n";
	$message .= $html;

	$message .= "\n--".$limite."--";

	// $params = "-f" . EMAIL_FROM_ADDR . " -O DeliveryMode=b";
	// $result = mail($email, $subject, $message, $headers, $params);
	// if (!$result) {
	// 	Logger::getInstance()->error("[EMAIL] Email delivery declined !");
	// }

	//Create a new PHPMailer instance
	$mail = new PHPMailer;

	//Tell PHPMailer to use SMTP
	$mail->isSMTP();

	//Enable SMTP debugging
	// SMTP::DEBUG_OFF = off (for production use)
	// SMTP::DEBUG_CLIENT = client messages
	// SMTP::DEBUG_SERVER = client and server messages
	$mail->SMTPDebug = SMTP::DEBUG_OFF;

	//Set the hostname of the mail server
	$mail->Host = 'smtp.gmail.com';
	// use
	// $mail->Host = gethostbyname('smtp.gmail.com');
	// if your network does not support SMTP over IPv6

	//Set the SMTP port number - 587 for authenticated TLS, a.k.a. RFC4409 SMTP submission
	$mail->Port = 587;

	//Set the encryption mechanism to use - STARTTLS or SMTPS
	$mail->SMTPSecure = PHPMailer::ENCRYPTION_STARTTLS;

	//Whether to use SMTP authentication
	$mail->SMTPAuth = true;

	//Username to use for SMTP authentication - use full email address for gmail
	$mail->Username = '[email protected]';

	//Password to use for SMTP authentication
	$mail->Password = 'xxxxxxxxxxx';

	//Set who the message is to be sent from
	$mail->setFrom($from, 'Ficusonline');

	//Set an alternative reply-to address
	$mail->addReplyTo('[email protected]', 'Ficusonline');

	//Set who the message is to be sent to
	$mail->addAddress($to, 'to registry user');

	//Set the subject line
	$mail->Subject = $subject;

	$mail->addCustomHeader('Content-Type: multipart/alternative; boundary="'.$limite.'"');

	//Read an HTML message body from an external file, convert referenced images to embedded,
	//convert HTML into a basic plain-text alternative body
	//$mail->msgHTML(file_get_contents('contents.html'), __DIR__);

	//An HTML or plain text message body.
	//If HTML then call isHTML(true).
	$mail->isHTML(true);
	$mail->Body = $message;

	//Replace the plain text body with one created manually
	//$mail->AltBody = 'This is a plain-text message body';

	//Attach an image file
	//$mail->addAttachment('images/phpmailer_mini.png');

	//send the message, check for errors
	if (!$result=$mail->send()) {
		//echo 'Mailer Error: '. $mail->ErrorInfo;
		Logger::getInstance()->error("[EMAIL] Email delivery declined !");
	} else {
		Logger::getInstance()->debug("[EMAIL] Email sent: result= " . $result);
		//echo 'Message sent!';
		//Section 2: IMAP
		//Uncomment these to save your message in the 'Sent Mail' folder.
		#if (save_mail($mail)) {
		#    echo "Message saved!";
		#}
	}

}
3-3. email認証用PHPファイルの作成
Linphoneのアシスタントメニューのユーザ登録画面からユーザ登録すると、ユーザ名とランダムなキーからアカウントを有効にするための認証用リンク先が記載されたアカウント認証メールが登録メールアドレス宛に送信されます。
この認証用PHPファイルを新規作成します。デフォルトで戻り値はSHA-256で暗号化されたパスワードが表示されるため、この戻り値は各々の好みで変更して下さい。
mail_activate.php
<?php

/*
	Flexisip Account Manager is a set of tools to manage SIP accounts.
	Copyright (C) 2019 Belledonne Communications SARL, All rights reserved.

	This program is free software: you can redistribute it and/or modify
	it under the terms of the GNU Affero General Public License as
	published by the Free Software Foundation, either version 3 of the
	License, or (at your option) any later version.

	This program is distributed in the hope that it will be useful,
	but WITHOUT ANY WARRANTY; without even the implied warranty of
	MERCHANTABILITY or FITNESS FOR A PARTICULAR PURPOSE.  See the
	GNU Affero General Public License for more details.

	You should have received a copy of the GNU Affero General Public License
	along with this program.  If not, see <http://www.gnu.org/licenses/>.
*/

include_once __DIR__ . '/xmlrpc.php';

$username = $_GET['username'];
$key = $_GET['key'];
$algo = $_GET['algo'];
$method = "activate_email_account";
$params = array ($username, $key, "sip.example.com", $algo);
$request = xmlrpc_encode_request($method, $params, array('output_type' => 'xml','encoding' => 'utf-8'));

// echo $request;

// $options = array('output_type' => 'xml', 'version' => 'auto');
echo xmlrpc_server_call_method($server, $request, null);

?>
4. 動作確認
4-1. リモート設定ファイルの読込
アシスタント---->リモート設定—>プロビジョニングアドレス:
https://sip.example.cpm/flexisip-account-manager/provisioning.php
または、
https://sip.example.cpm/flexisip-account-manager/provisioning.xml
を入力します。
設定を有効にするためLinphoneを再起動します。
4-2. ユーザ登録・メール認証
アシスタントのアカウント作成メニューから、ユーザ名、パスワード、メールアドレスを入力してユーザ登録を行います。

登録メールアドレス宛に送信された内容に認証用ページが表示されるのでクリックしてアクティベートします。
アクティベート後、以下の登録完了ボタンを押して登録作業は完了です。
